
The Basics of Oboe Reed Adjusting
Adjusting an oboe reed involves making small changes so the reed better suits your needs. In this guide, oboist Anna Betuzzi walks you through the basic techniques you can use when learning to adjust your reeds.
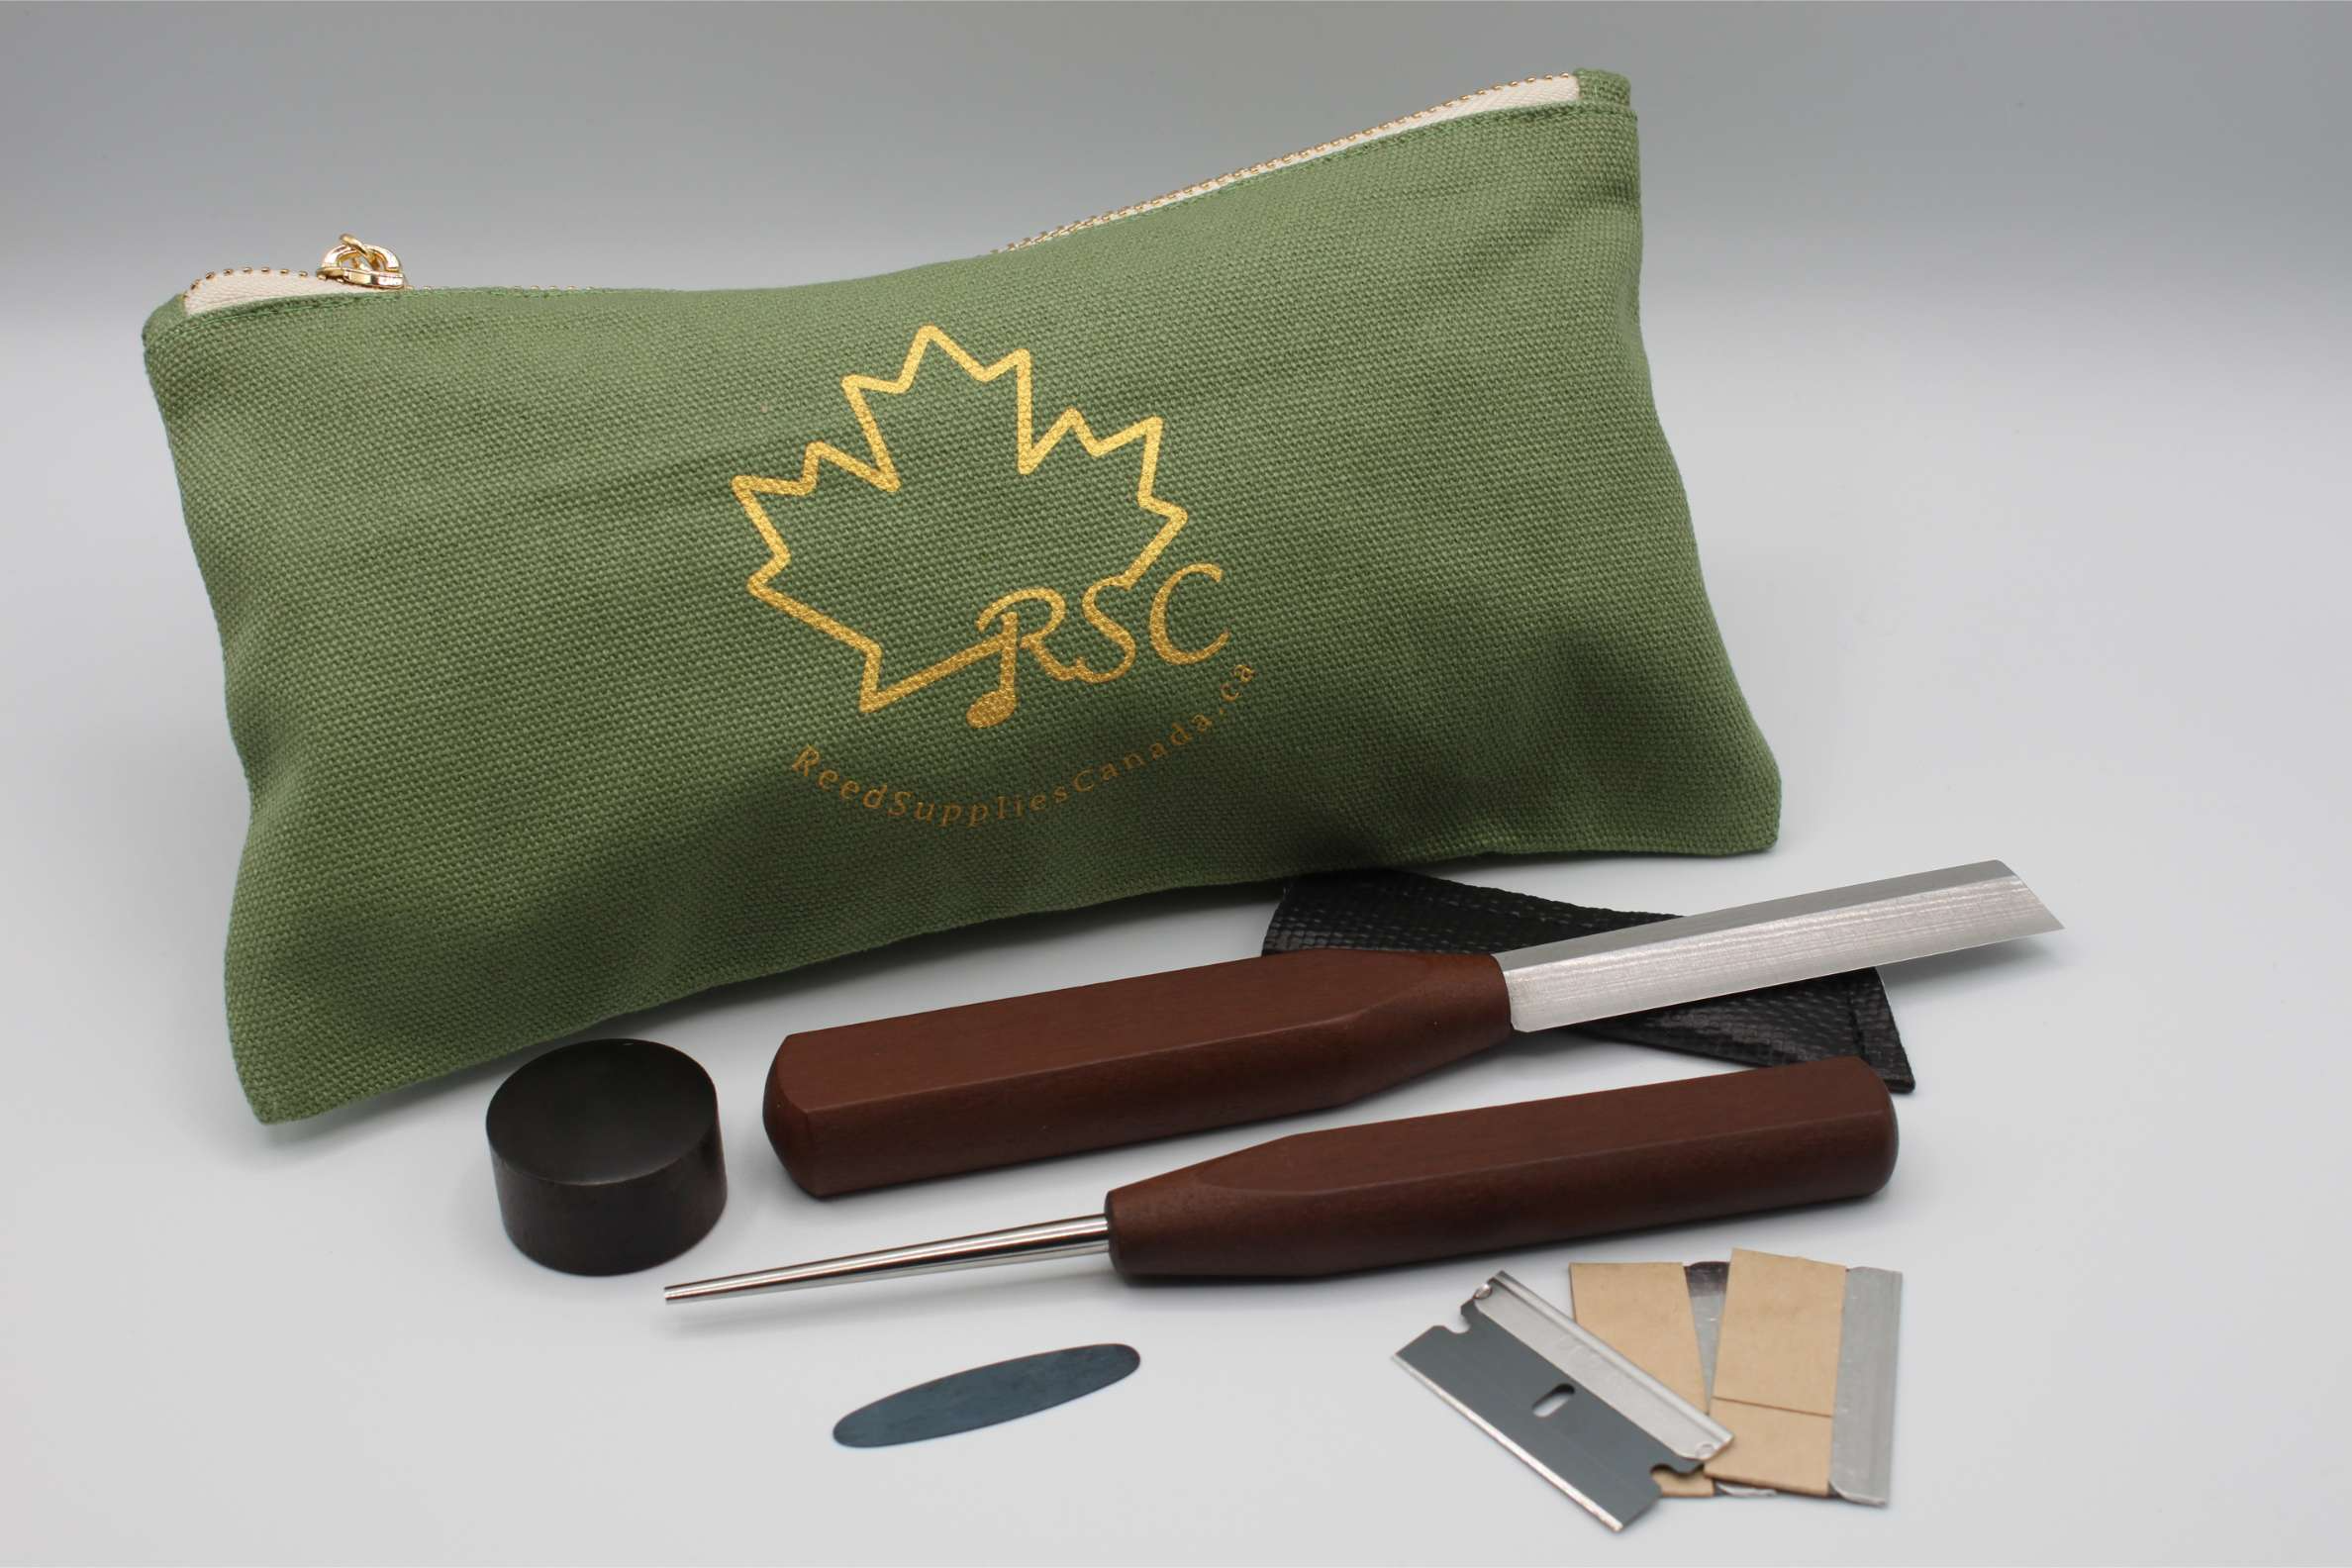
For a rundown on the tools you will need in order to make these adjustments, check out our article on Essential Tools for Oboe Reed Adjusting.
Before you get started:
It’s good practice to try your reed after every single adjustment you make. This will allow you to determine whether the adjustment had the desired effect and whether additional adjustments are needed.
Think of it like a science experiment: you need to know if one variable worked before you can move on to the next variable!
The Anatomy of an Oboe Reed
Before we dig into the various adjustment types, it’s important to understand the different sections of an oboe reed and how they work. This diagram of an American Scrape oboe reed (which is the most common style in North America) shows the basic sections of an oboe reed:
The tip is a thin section at the very top of the reed. It ensures the reed responds properly, or in other words, that the sound starts and stops when you want it to.
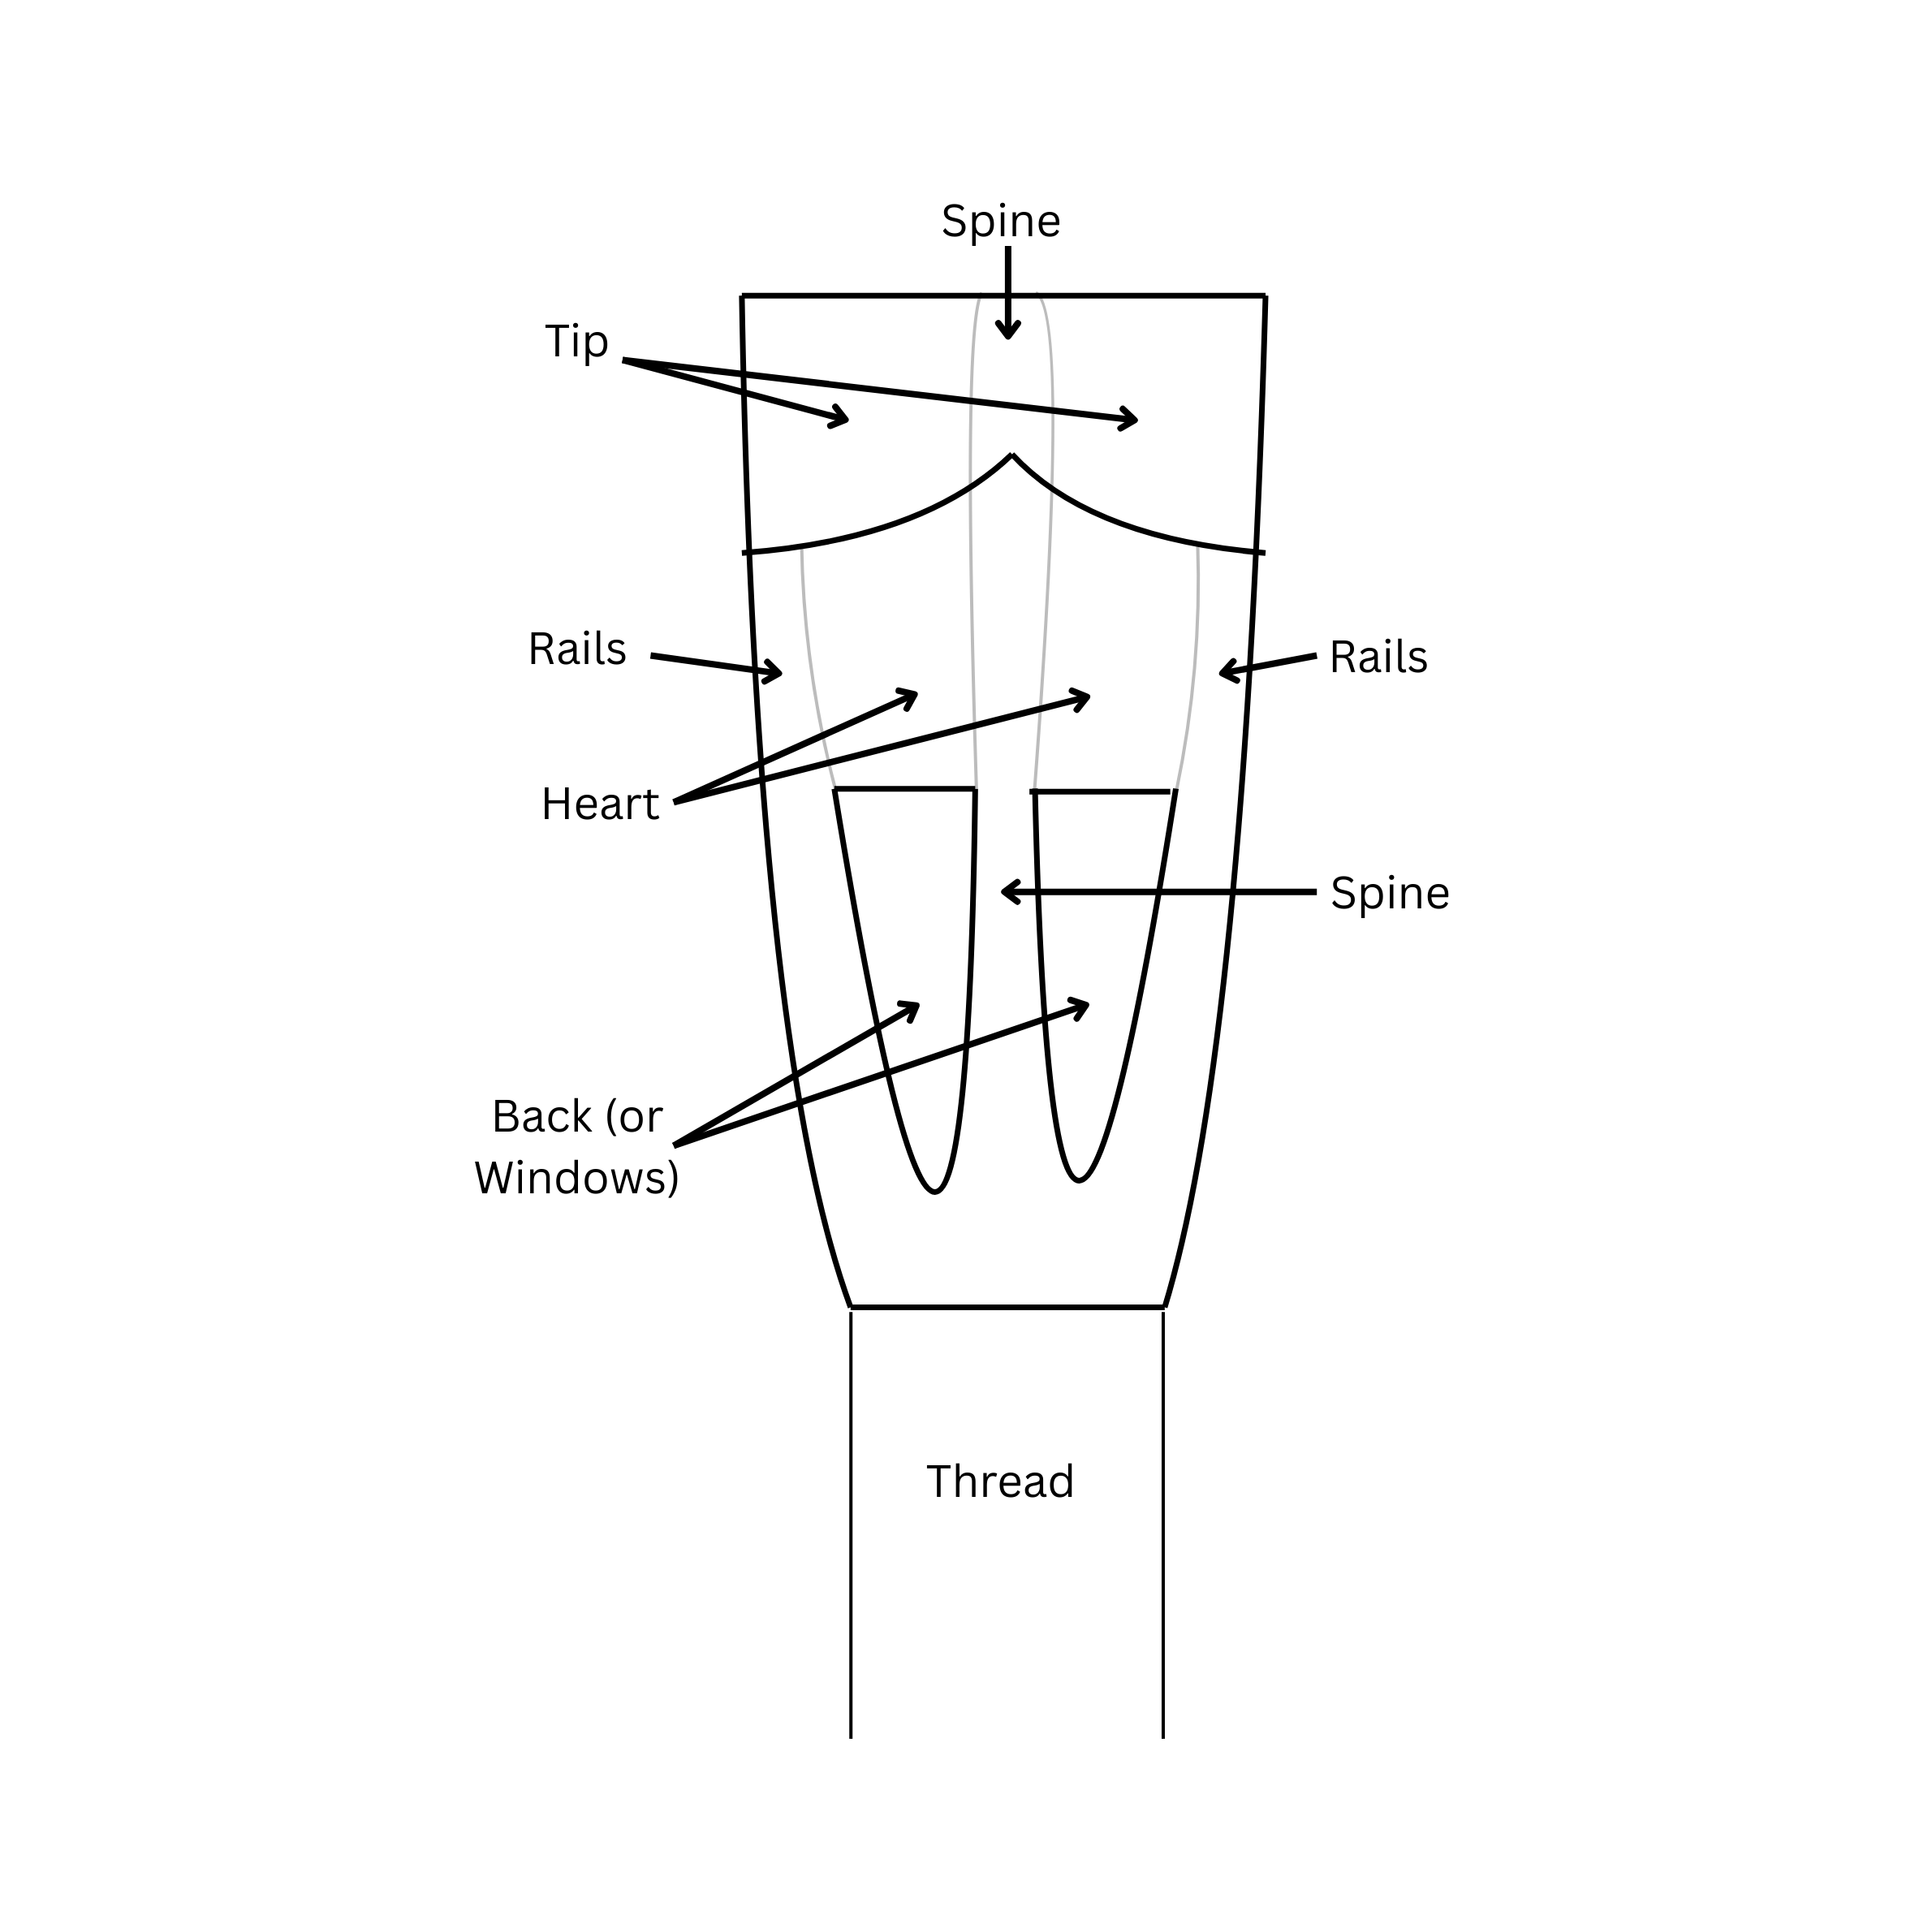
The heart is a thicker section in the middle of the reed. It provides depth and richness to your sound, while also giving you some resistance, which is essential for playing both loudly and softly.
The back (also called the windows) is towards the bottom of the reed. This section has many functions, including controlling the intonation of the reed, giving stability, and making sure the reed is not too hard to play on.
The rails are a narrow section on the sides of the heart and back, where the reed has not been scraped at all. It’s important to avoid scraping in this area when making adjustments. The thickness of the rails keeps your reed from leaking and ensures a good tip opening size.
The spine is the slightly thicker section all the way up the middle of the reed. It’s also best to avoid scraping in this area when learning to adjust your reeds, as the spine gives structural integrity to the reed.
How to Use a Reed Knife
Using proper reed knife technique will help you scrape the reed effectively, and it will ensure that the reed isn’t damaged in the process.
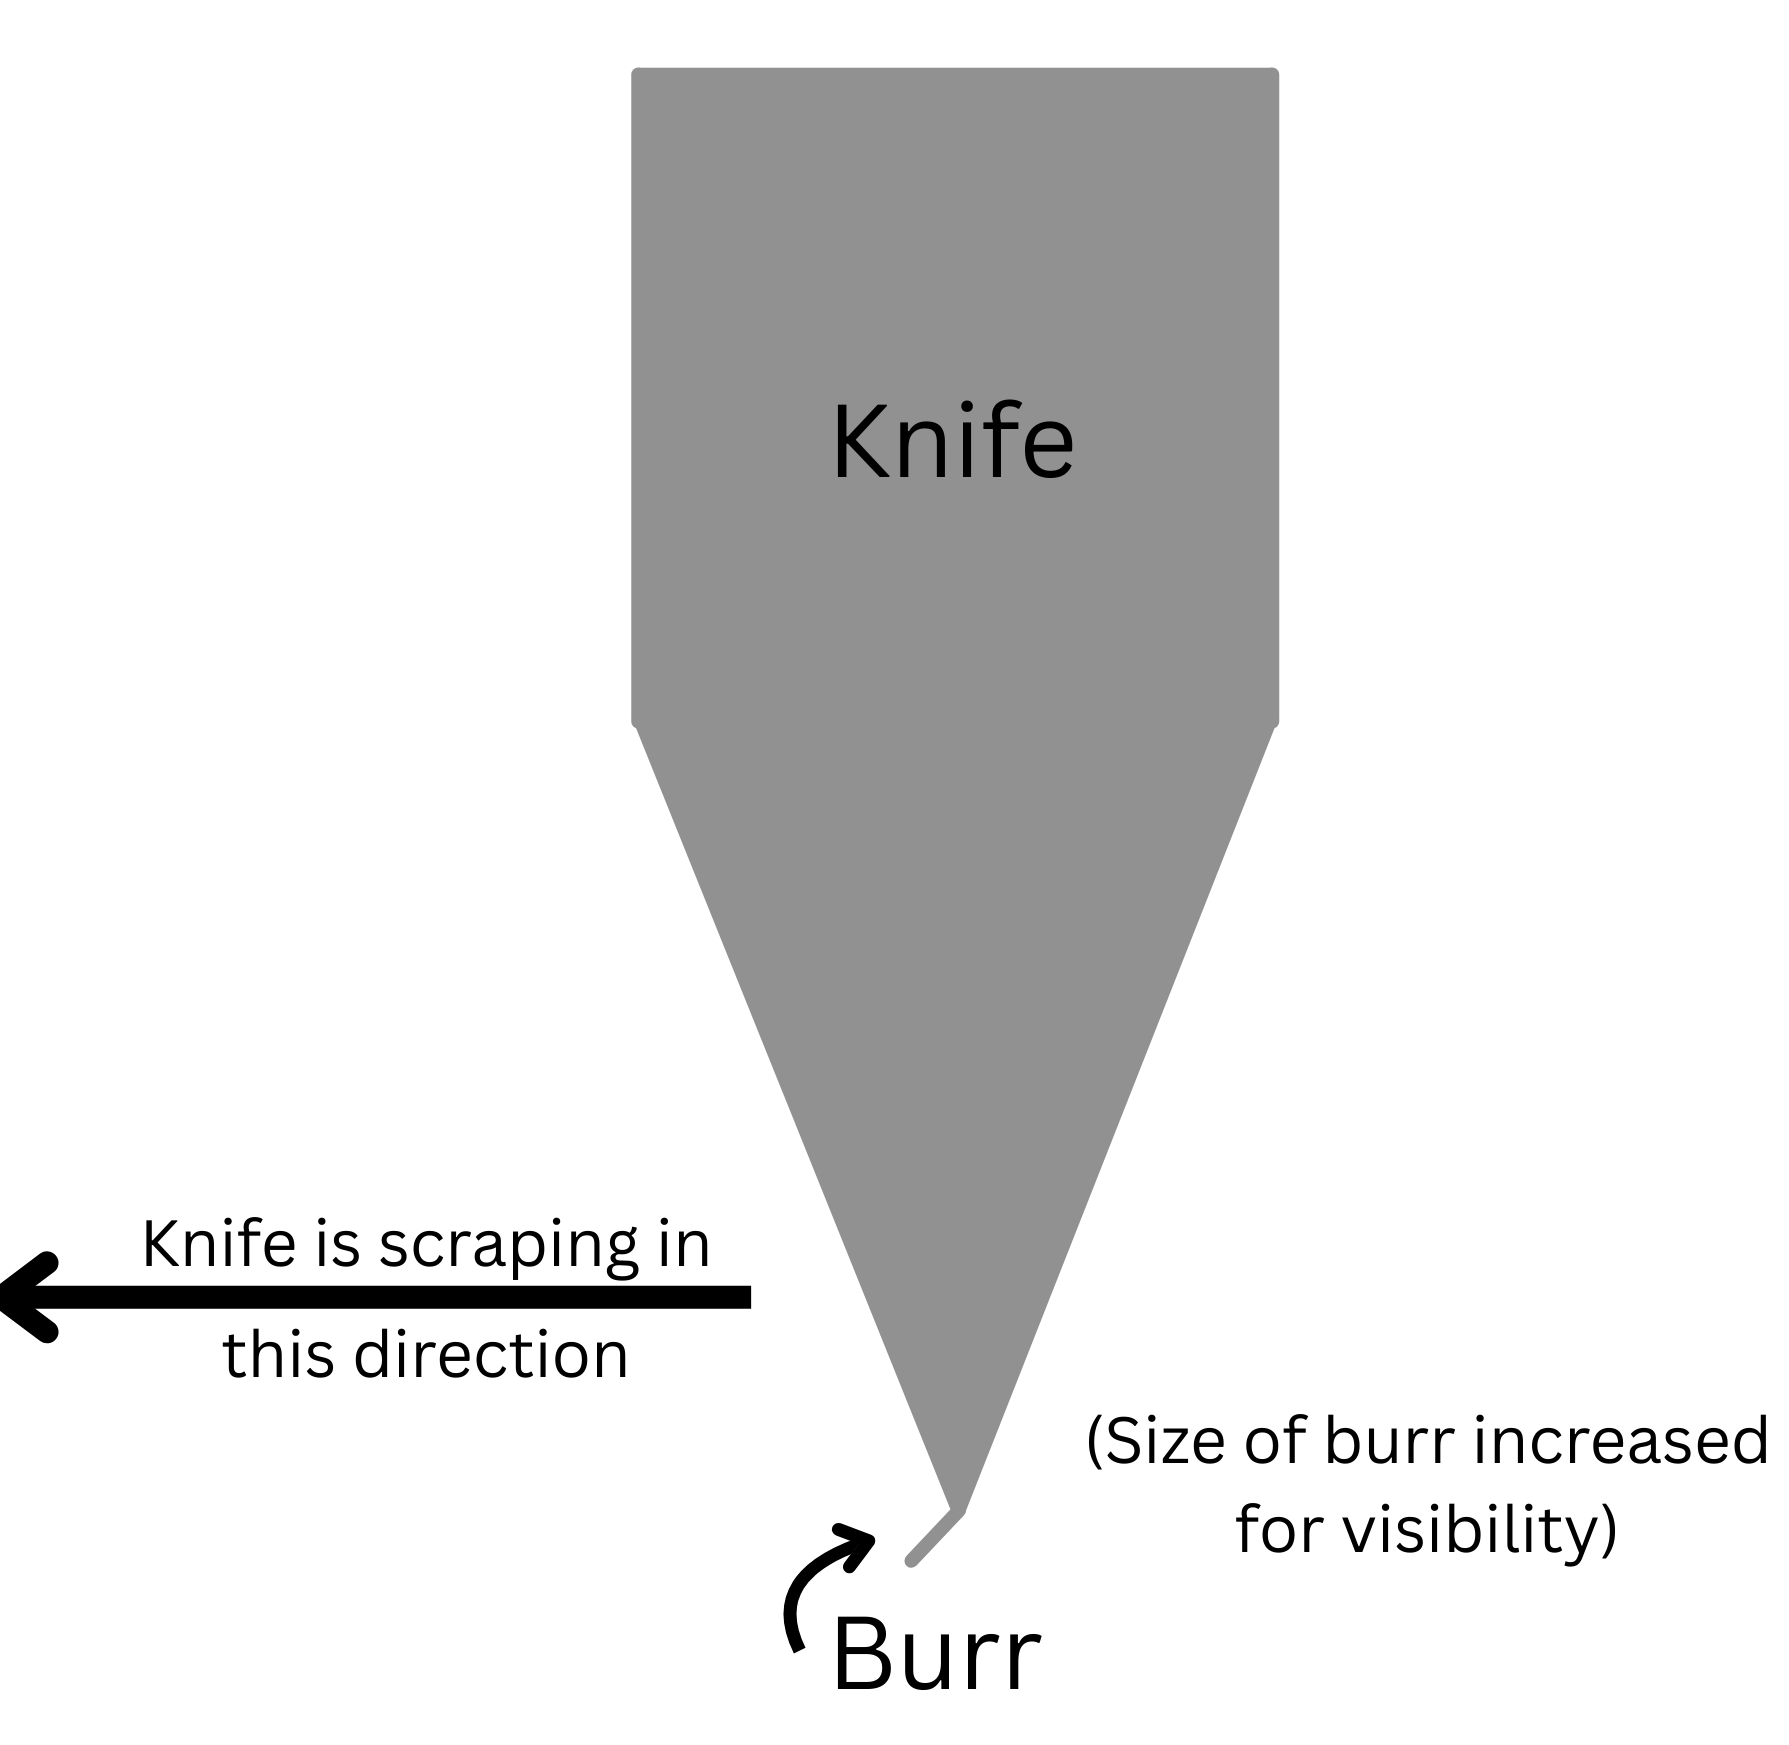
The reed knife doesn’t cut the cane, it actually removes the cane by scraping. This means the knife catches a small amount of cane every time it passes over the surface. The burr is a slightly angled part at the edge of the knife, which performs the scraping action. Here’s a cross-section diagram of a reed knife to demonstrate what the burr looks like:
Here’s how to use your reed knife to scrape:
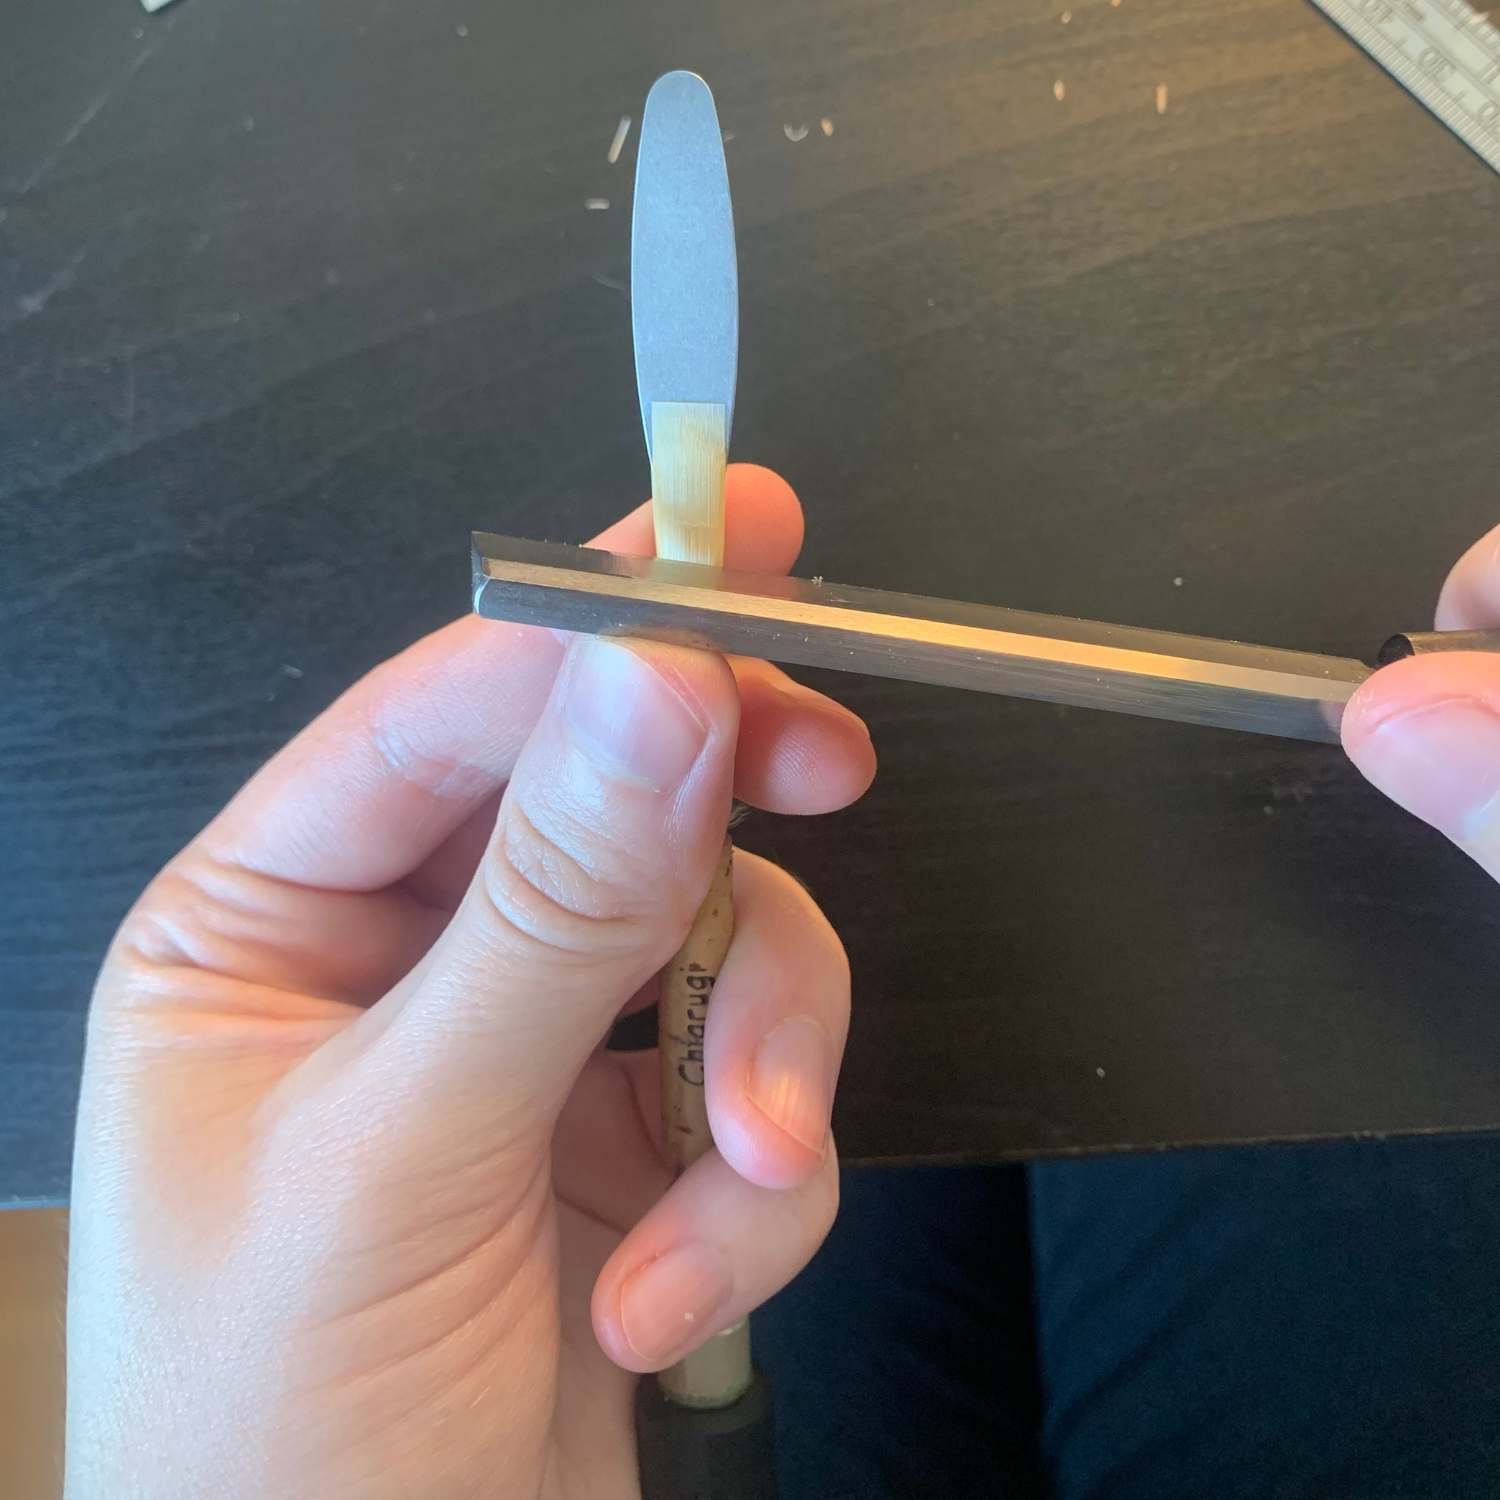
- Hold the knife in your dominant hand (make sure you have the correct right-handed or left-handed knife type!)
- Rest your non-dominant thumb on the flat part of the knife closest to you.
- Place your non-dominant index finger on the side of the reed that is facing away from you to support the reed.
- Gently place the knife on the reed in the place you want to scrape.
- Push the knife away from you using your non-dominant thumb. This will scrape the part of the reed that the knife touches.
Here’s what your hands will look like while holding the reed knife (demonstrated by a right-handed reed maker):
How to Avoid Digging Holes in Your Reed!
Always make sure that the motion is a pushing motion, not a scooping motion. Using a scooping motion can result in an uneven amount of cane being removed, and it may damage the corners of your reed if you’re scraping on the tip.To avoid damage to your reed, ensure that the wrist of the hand holding the knife is steady and does not move or twist while you are scraping. Think of gliding the knife over the surface of the reed, and let the burr of the knife do the work.
To precisely control the part of the reed that you are scraping, you can:
- Point the tip of the knife higher or lower. This controls the side of the reed (left to right) that is being scraped.
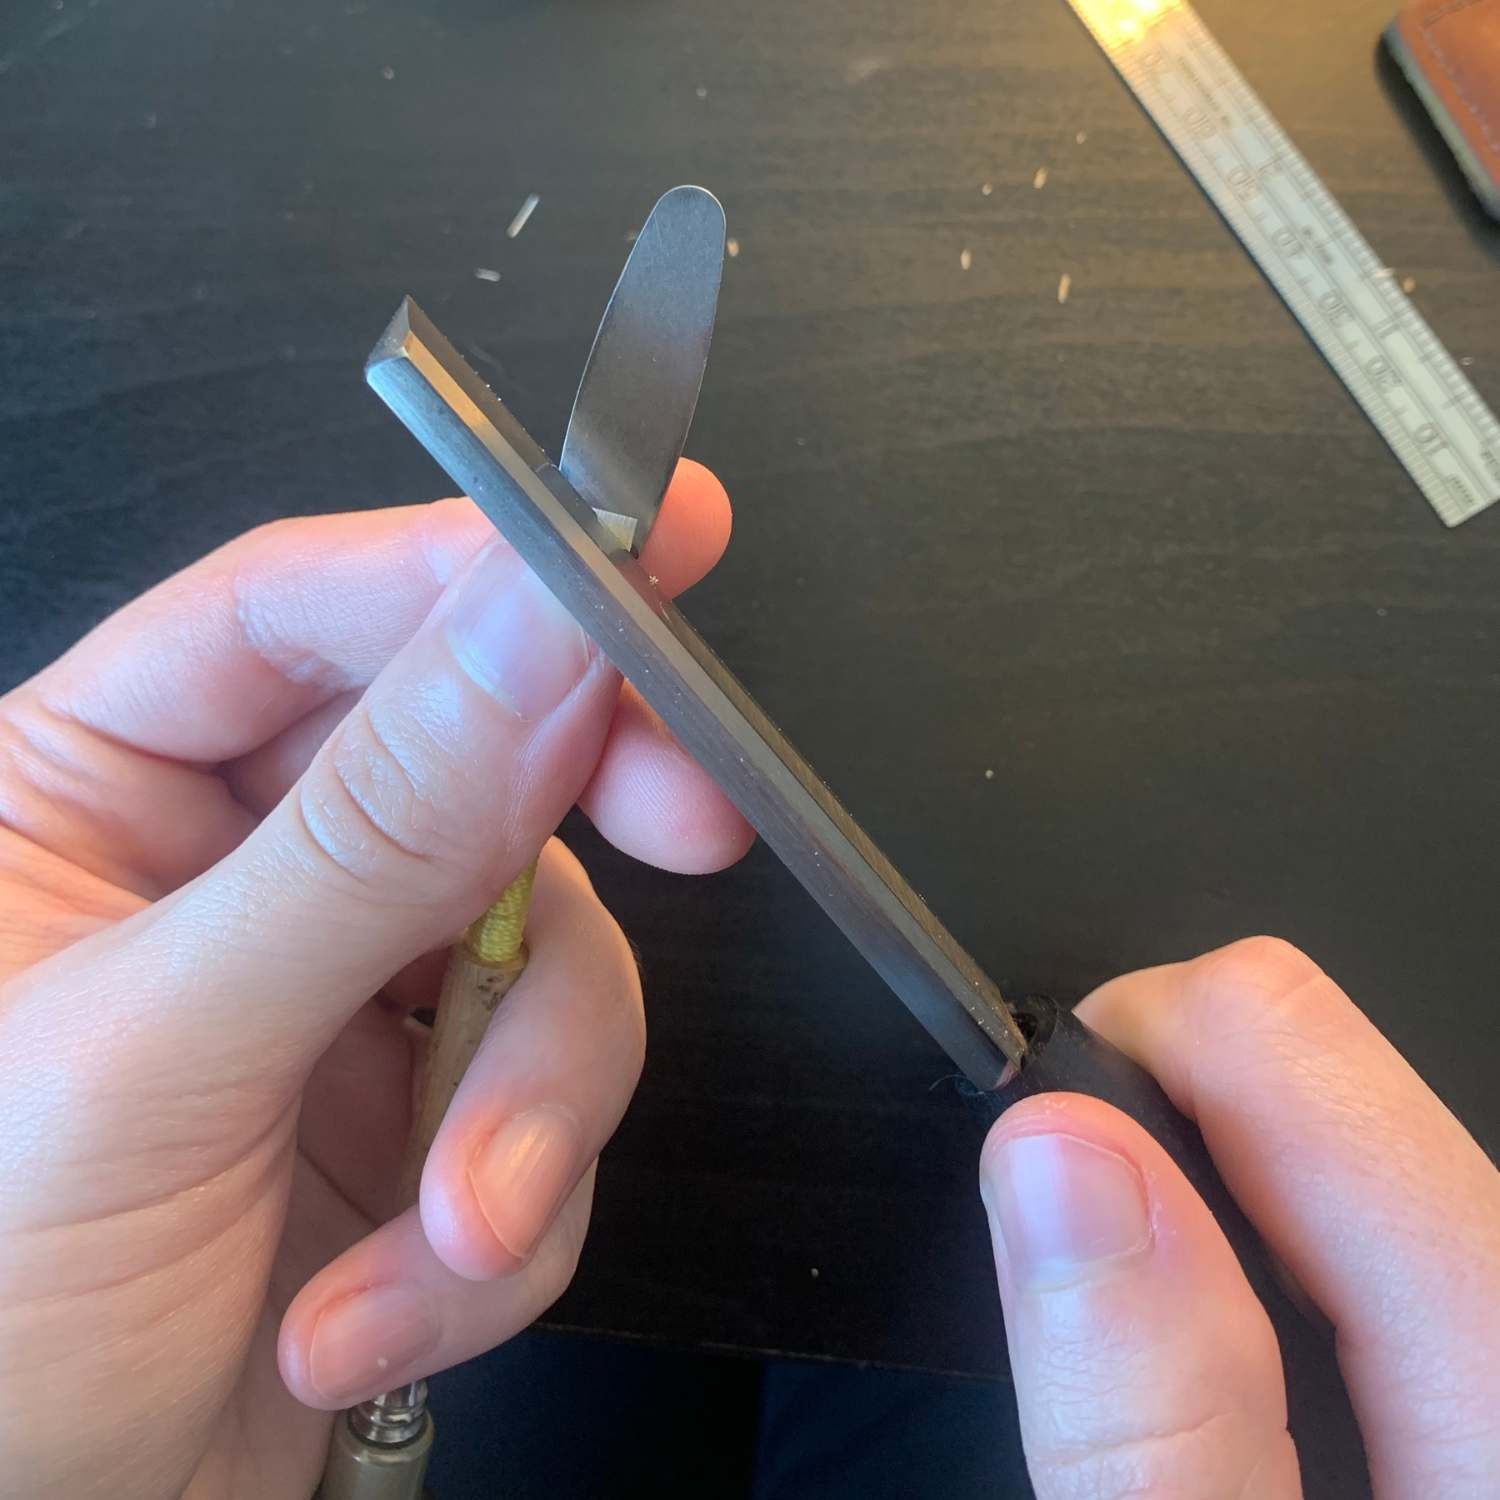
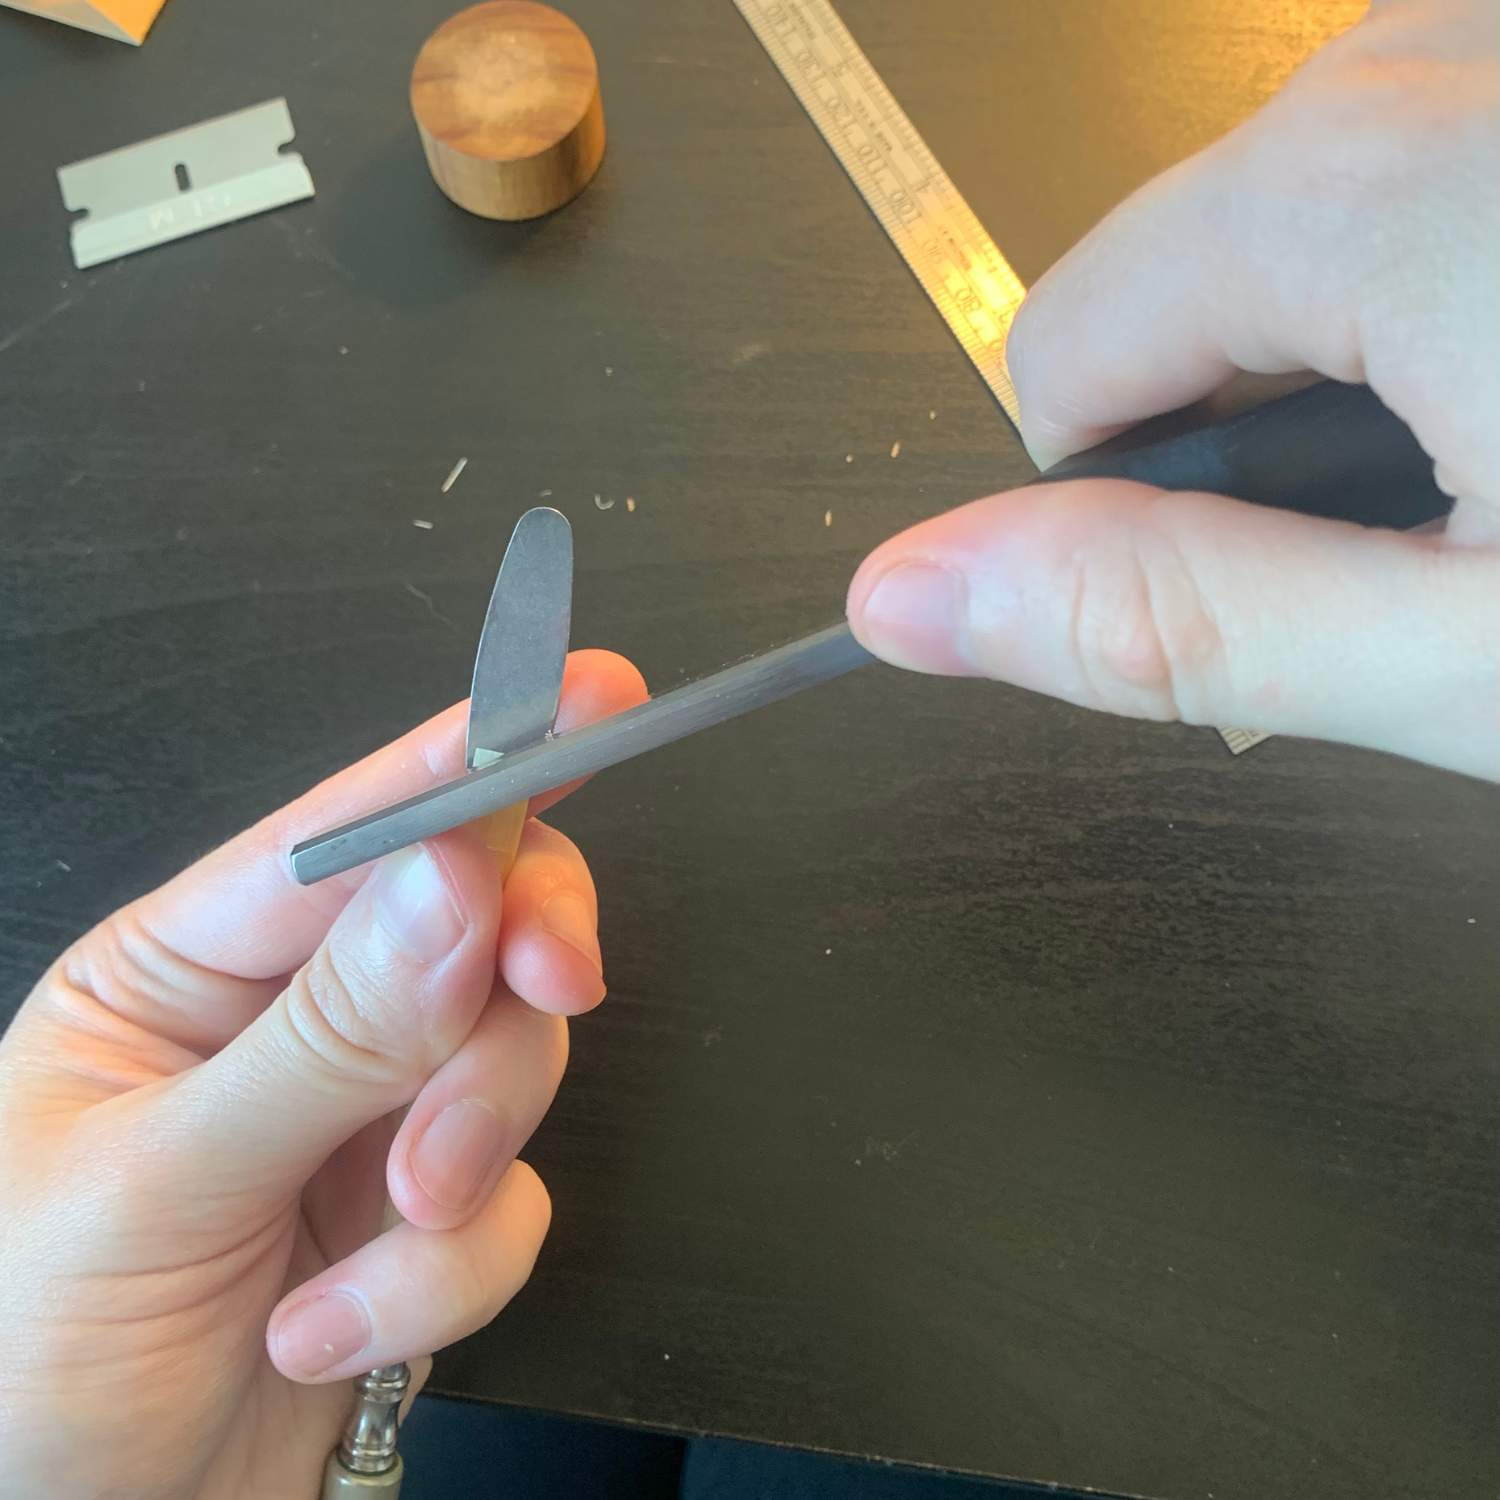
- Move the elbow of your dominant hand up or down. This changes the angle at which the knife touches the reed. Make sure to angle the reed knife so it scrapes towards the corner of the reed, especially when you are scraping the tip:
Your knife should look like this when scraping the right side of the tip.
And it should look like this when scraping the left side of the tip.
How to Know Which Adjustment to Make?
Playing the reed by itself (without the oboe attached) has a lot of valuable information about how the reed is functioning. There are two types of tests you can do with just the reed.
Peeping
Peeping the reed means playing the reed alone with your normal playing position/embouchure. This can tell you how resistant the reed is (how hard or easy it is to play), and also the pitch of the reed. To play in tune, your reed should produce a C when played by itself, which sounds like this:
If it’s very difficult to make the reed peep, you may need to close the tip opening [Adjustment 1] or scrape the tip [Adjustment 3]. If the peep is more of a B or A in pitch (you can use a tuner to check its pitch), then you probably need to clip the tip [Adjustment 2].
Crowing
Crowing the reed means playing it while your lips are touching the thread, with the entire cane part of the reed inside your mouth. The crow of the reed has lots of information about whether the heart and back are working properly. Your crow ideally will sound like this:
You’ll notice the crow is actually more than one pitch at once! It should have a higher C (just like in the peep), plus a lower C at the same time.
If your crow only has one high note, you probably need to scrape the heart [Adjustment 4]. If the crow produces more of a C# or a D pitch in either note, the reed will be too sharp, and you probably need to scrape the back [Adjustment 5]. If it has a wild, noisy, raucous sound of more than two notes, you probably need to clip the reed [Adjustment 2].
If your reed is working just fine and you don’t have any other playable ones, it might be best to avoid adjusting it right now. Reeds are made of natural fibre, which can sometimes respond unpredictably to adjustments. Chasing the ‘perfect reed’ can only end in frustration. If it works, leave it be!
Adjustment 1: Change the Tip Opening Size
The first type of adjustment you can make to your reed does not require any tools at all!
The tip opening is the size of the hole at the top of your reed, where air enters the reed. If the tip opening is too large, your reed will be much too resistant (and may not even make a sound at all). If it is too small, the reed will sound weak and soft.
Here’s a diagram of tip opening sizes when you look into the top of your reed, so you can compare against your own reed:
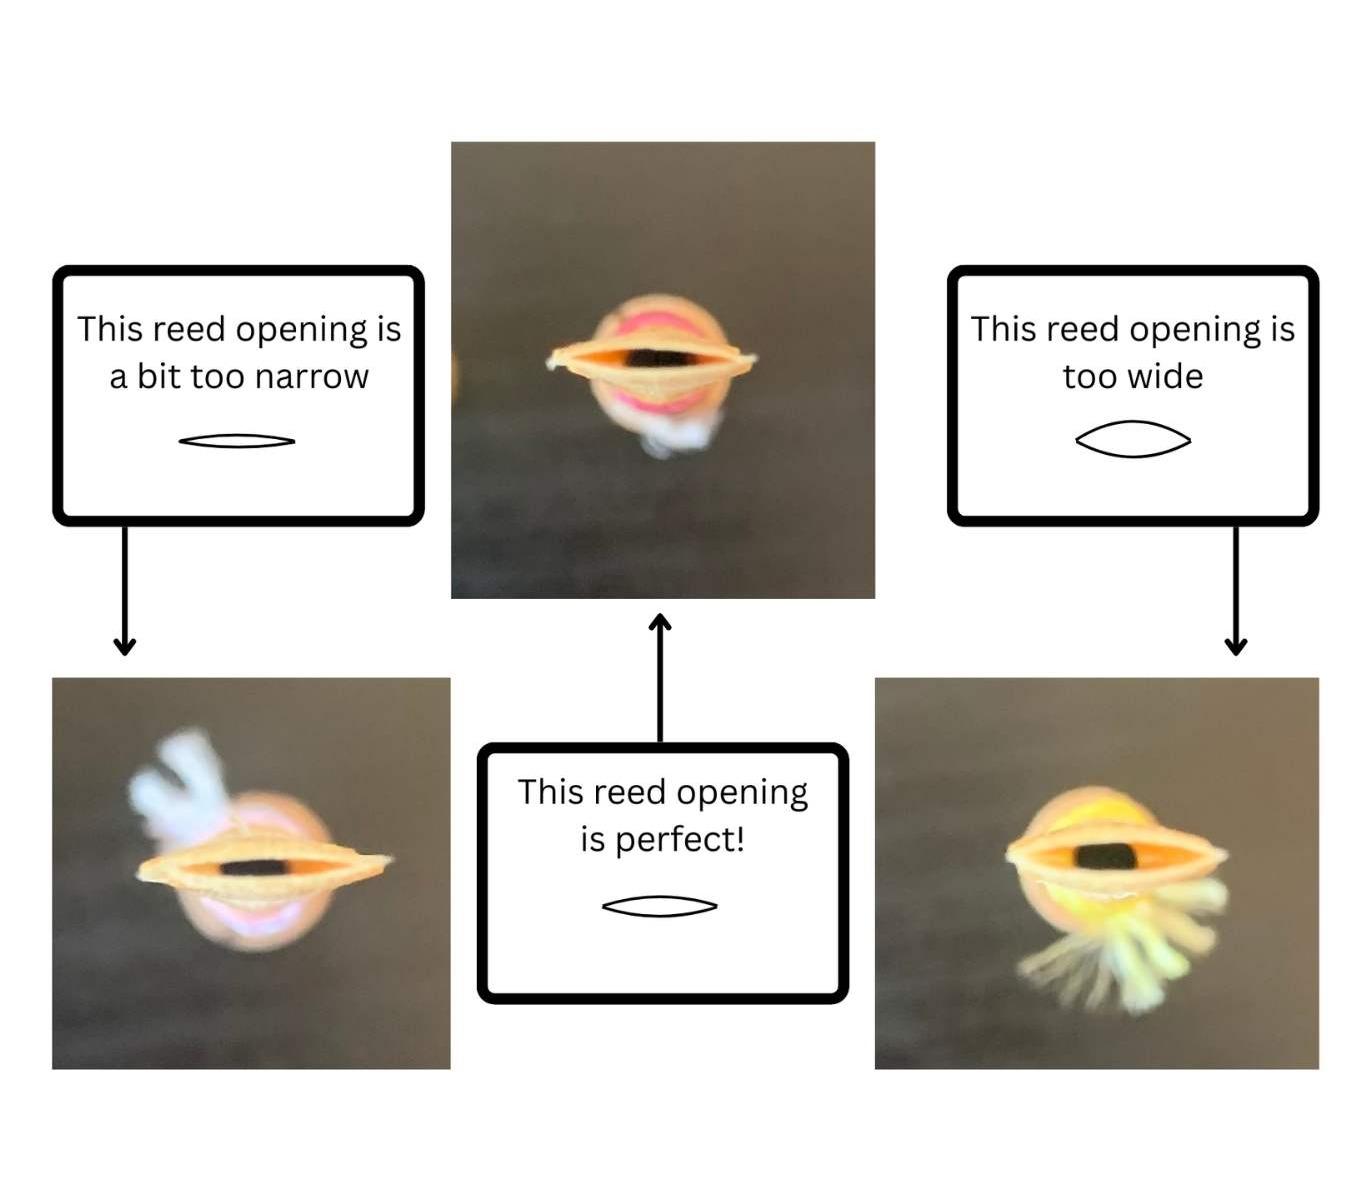
I like to think of the shape of the opening to know whether it is the right size. If it looks like a football, the reed is too open. If it is barely curved at all and looks straight like a grain of rice, it’s too closed. If it’s gently curved but not as much as a football, it’s just right!
To make the tip opening smaller, first ensure your reed has been properly soaked in water for 3-5 minutes. (Don’t try this technique while the reed is dry because it will crack!)
Next, gently massage the tip and heart of the reed. You can do this with the plaque inserted, or just with the reed by itself. After 10-15 seconds, check the tip opening again and try your reed to see if it has improved.
To make the tip opening bigger, also ensure your reed has been soaked in water for long enough. If the reed is not soaked long enough, the tip opening may appear smaller than it actually is. If the opening is still too small even when the reed is soaked, gently squeeze the sides of the reed until you see the tip opening increasing in size. Again, try the reed to see if this has made an improvement!
Adjustment 2: Clip the Tip
Clipping the tip involves using a razor blade and cutting block to make the reed shorter. Since you can’t ‘undo’ a clip, it’s important to clip as little as possible (think a hair’s width at a time).
Here are two reed clippings I had left on my cutting block, to show the usual amount that I clip at once:
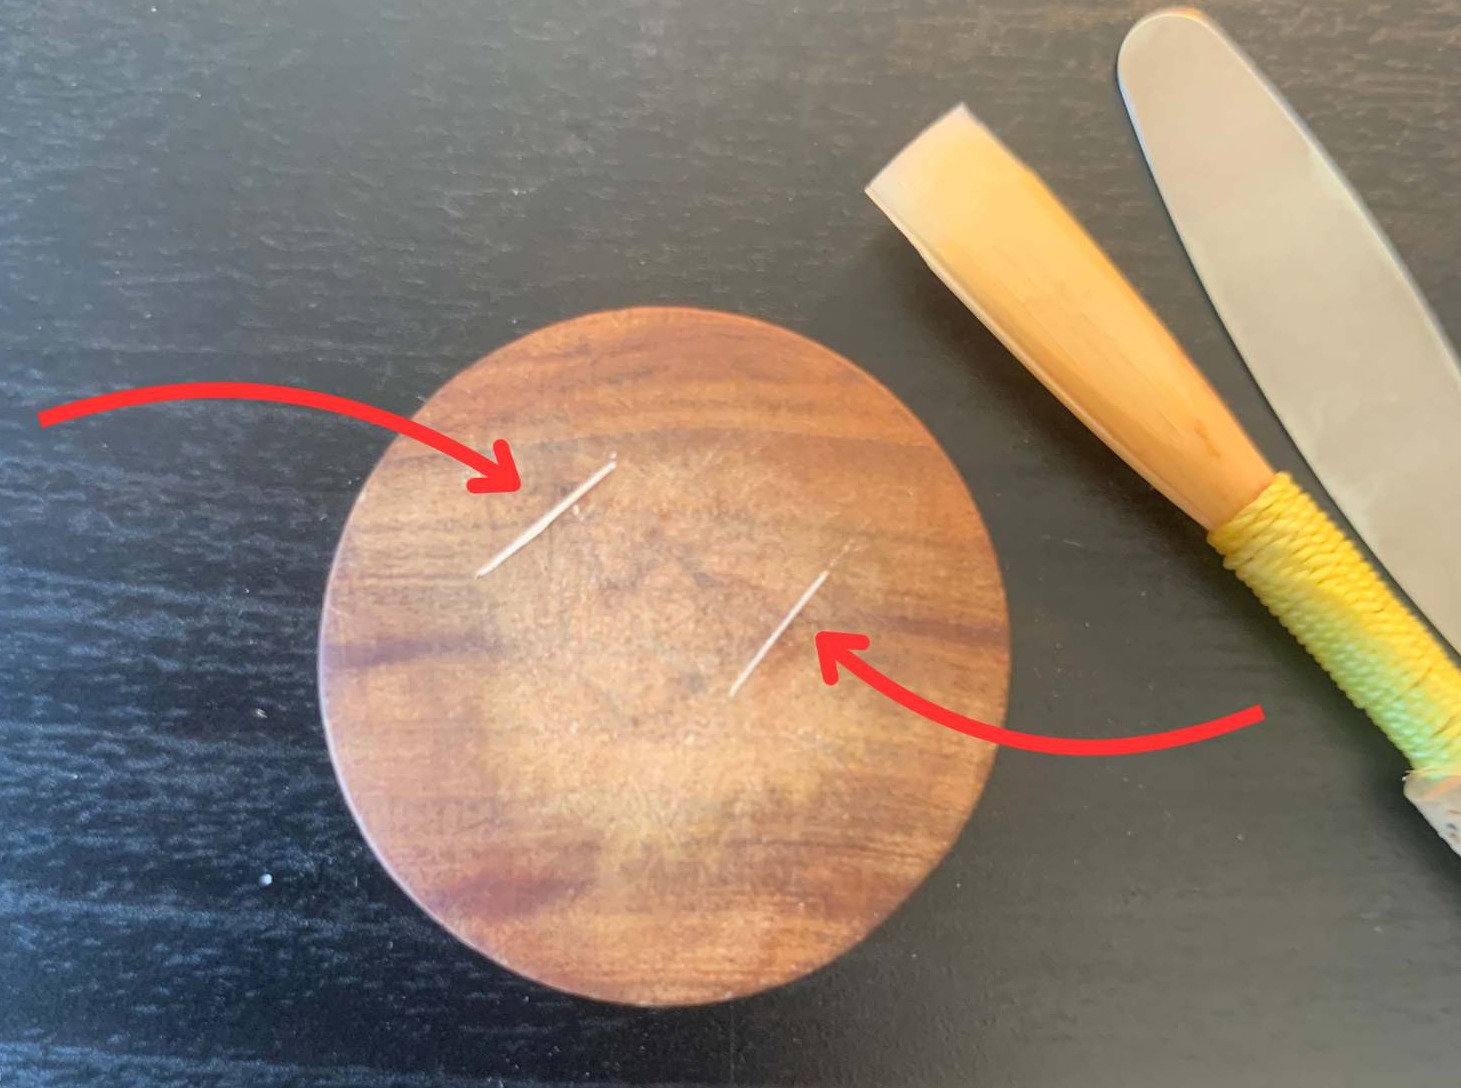
Clipping the reed will have two results: the reed will be higher in pitch, and it will be more resistant (or ‘harder’). You can’t have one without the other, so if your reed is really quite flat, be prepared to make additional adjustments (to compensate for the extra resistance) after clipping it.
Reed Length
Make sure to always measure your reed before and after you clip it. This will give you a sense of how much more wiggle room you have while adjusting your reed. Generally, American scrape reeds should measure between 70-71mm, but they can go as short as 69mm and still function properly. Any shorter, and the proportions of the different sections of the reed will not enable the reed to work well anymore.
Clipping angles:
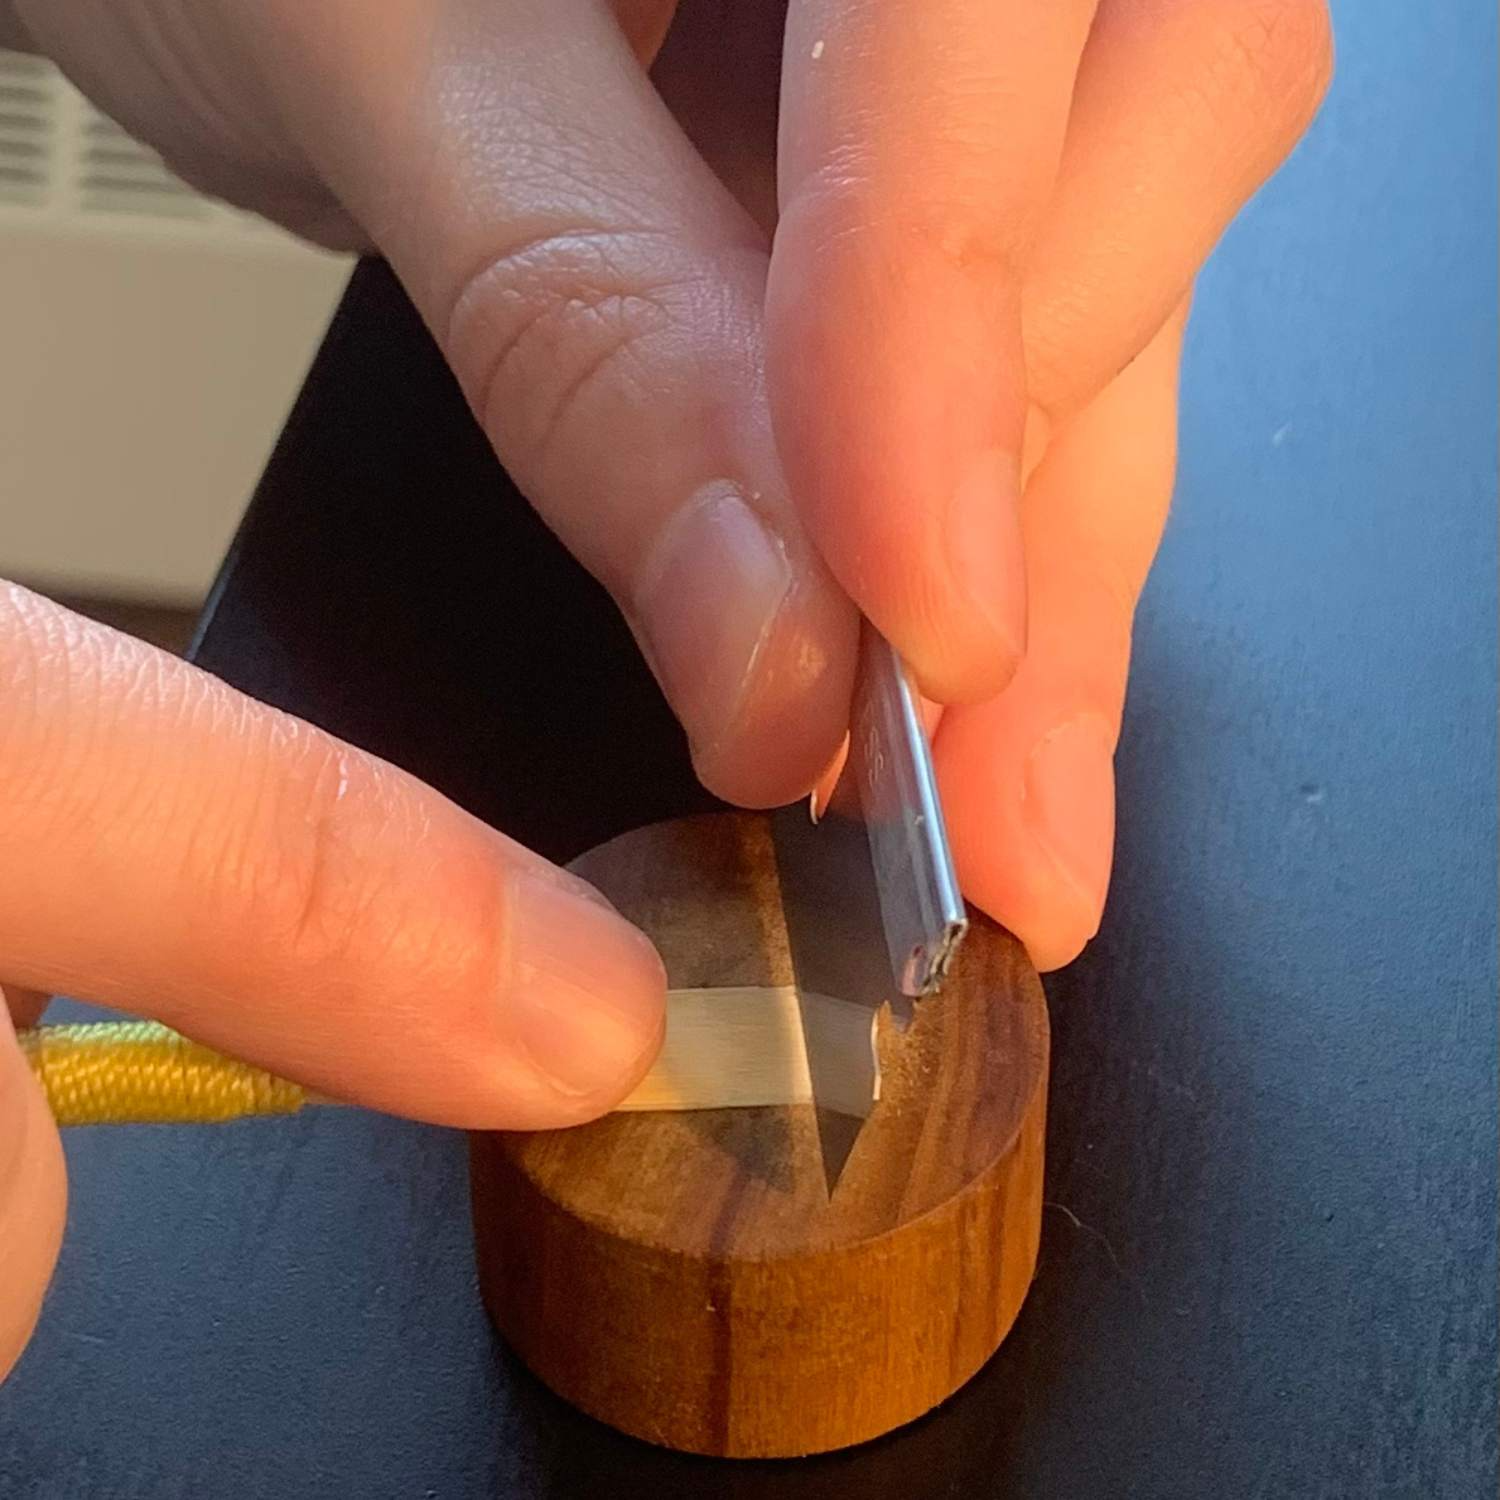
Depending on personal preference, you have several options for the angle at which to clip your reed. Some players like to hold the razor blade straight up and down, like this:
My personal preference is to clip the reed at a slight angle, like this:
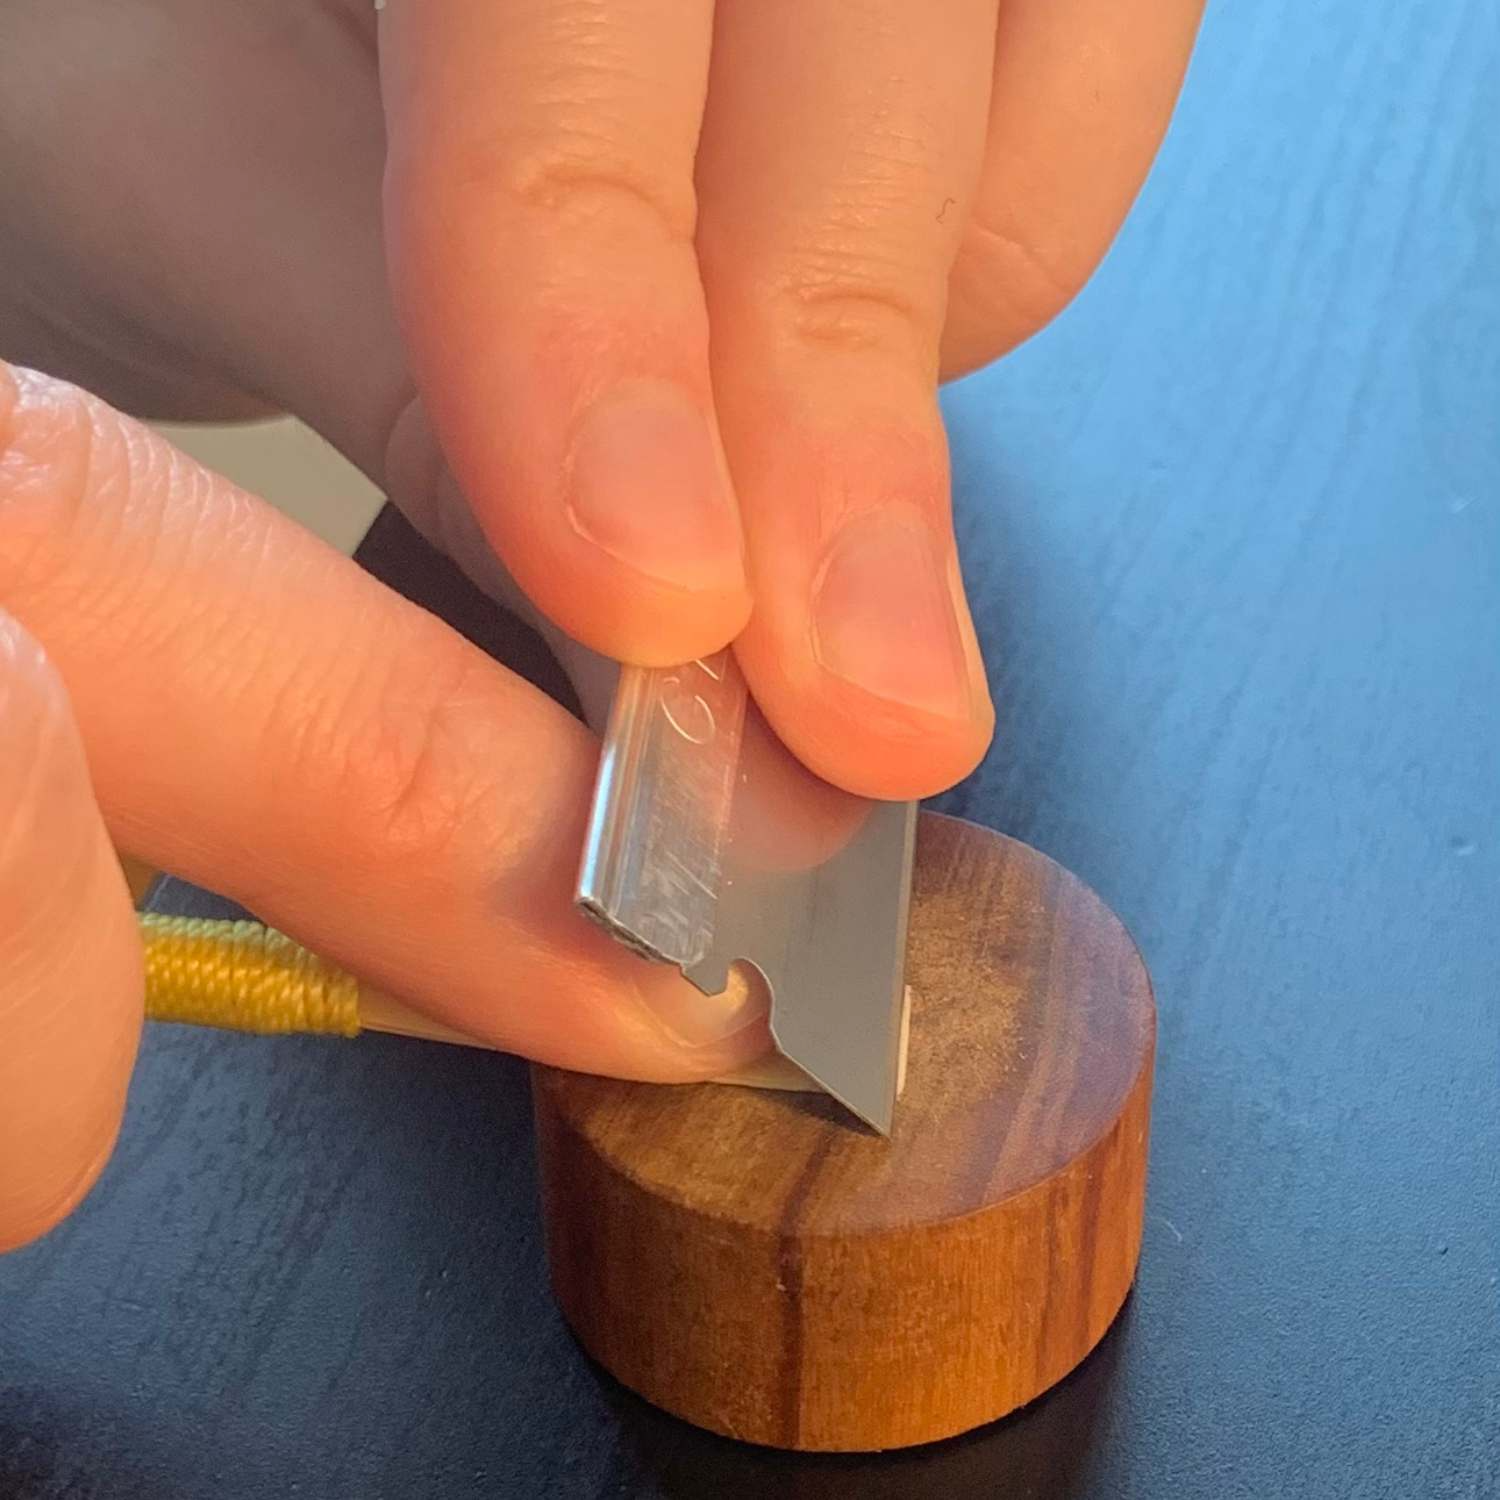
Clipping at an angle allows you to see exactly how much of the reed you are clipping at a time. It also creates an optimal angle for articulation. When the reed is put into your instrument, having an angled clip means that your tongue will evenly articulate on both pieces of the reed, rather than just the lower one!
Adjustment 3: Scrape the Tip
If the tip is too thick, your reed will feel too hard and unpredictable. When you play a reed with a thick tip, you may notice that the notes do not come out every time, especially low notes.
Scraping the tip is a delicate operation, as the tip is the thinnest section of the reed. It’s a good rule of thumb to be extra careful when scraping the tip. Removing even a small amount of cane from the tip can make a big difference, so always test your reed after a few scrapes on the tip.
To scrape the tip:
- Angle your knife and aim towards a corner of the reed, like this:
- Take one or two scrapes from each of the four corners (two corners on each side of the reed). Ensure the knife goes all the way off the reed onto the plaque. This will prevent bumps or chunks that are thicker than others.
- Test your reed by playing it.
- Repeat the process if the reed feels too hard still.
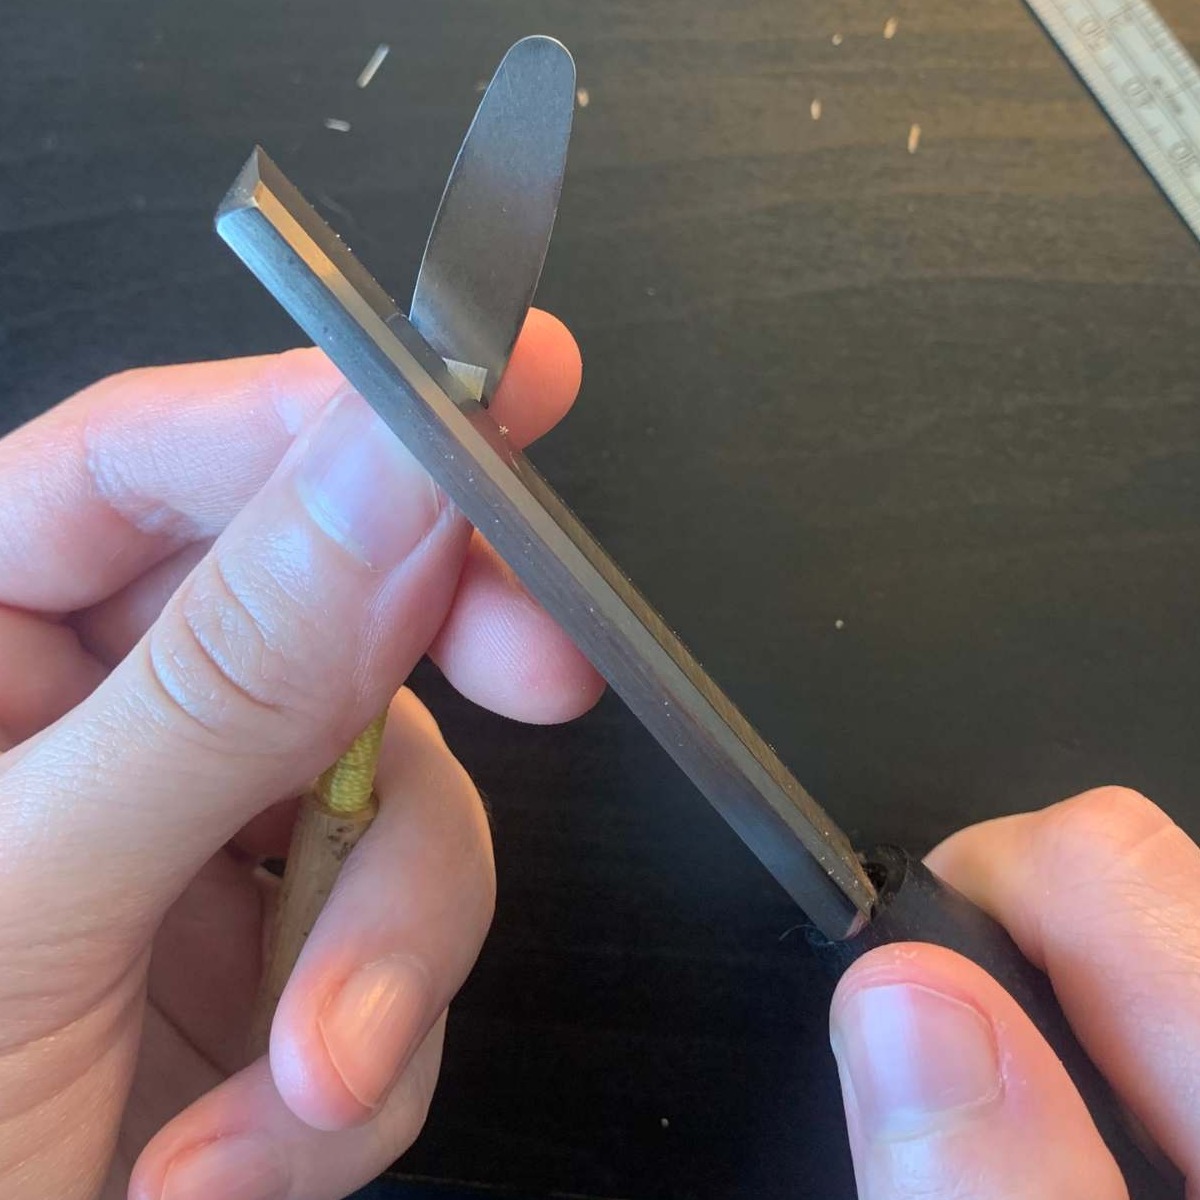
It’s very important that all four corners remain the same thickness as each other. This creates balance in the reed, ensuring that all four corners work together effectively. If one corner is thicker than the other three, the reed will not function as well anymore.
Adjustment 4: Scrape the Heart
If the heart is too thick, the sound vibrations will not be able to travel down the entire reed, which means the reed will be too resistant and will have a dampened/covered sound. You can determine if the heart needs to be scraped by crowing the reed. If your reed crow has only one note (or does not crow at all), scrape the heart until the reed crows properly.
To scrape the heart:
1. Point the tip of your knife up (down for left-handed), and place the knife on the right side of the heart, like this:
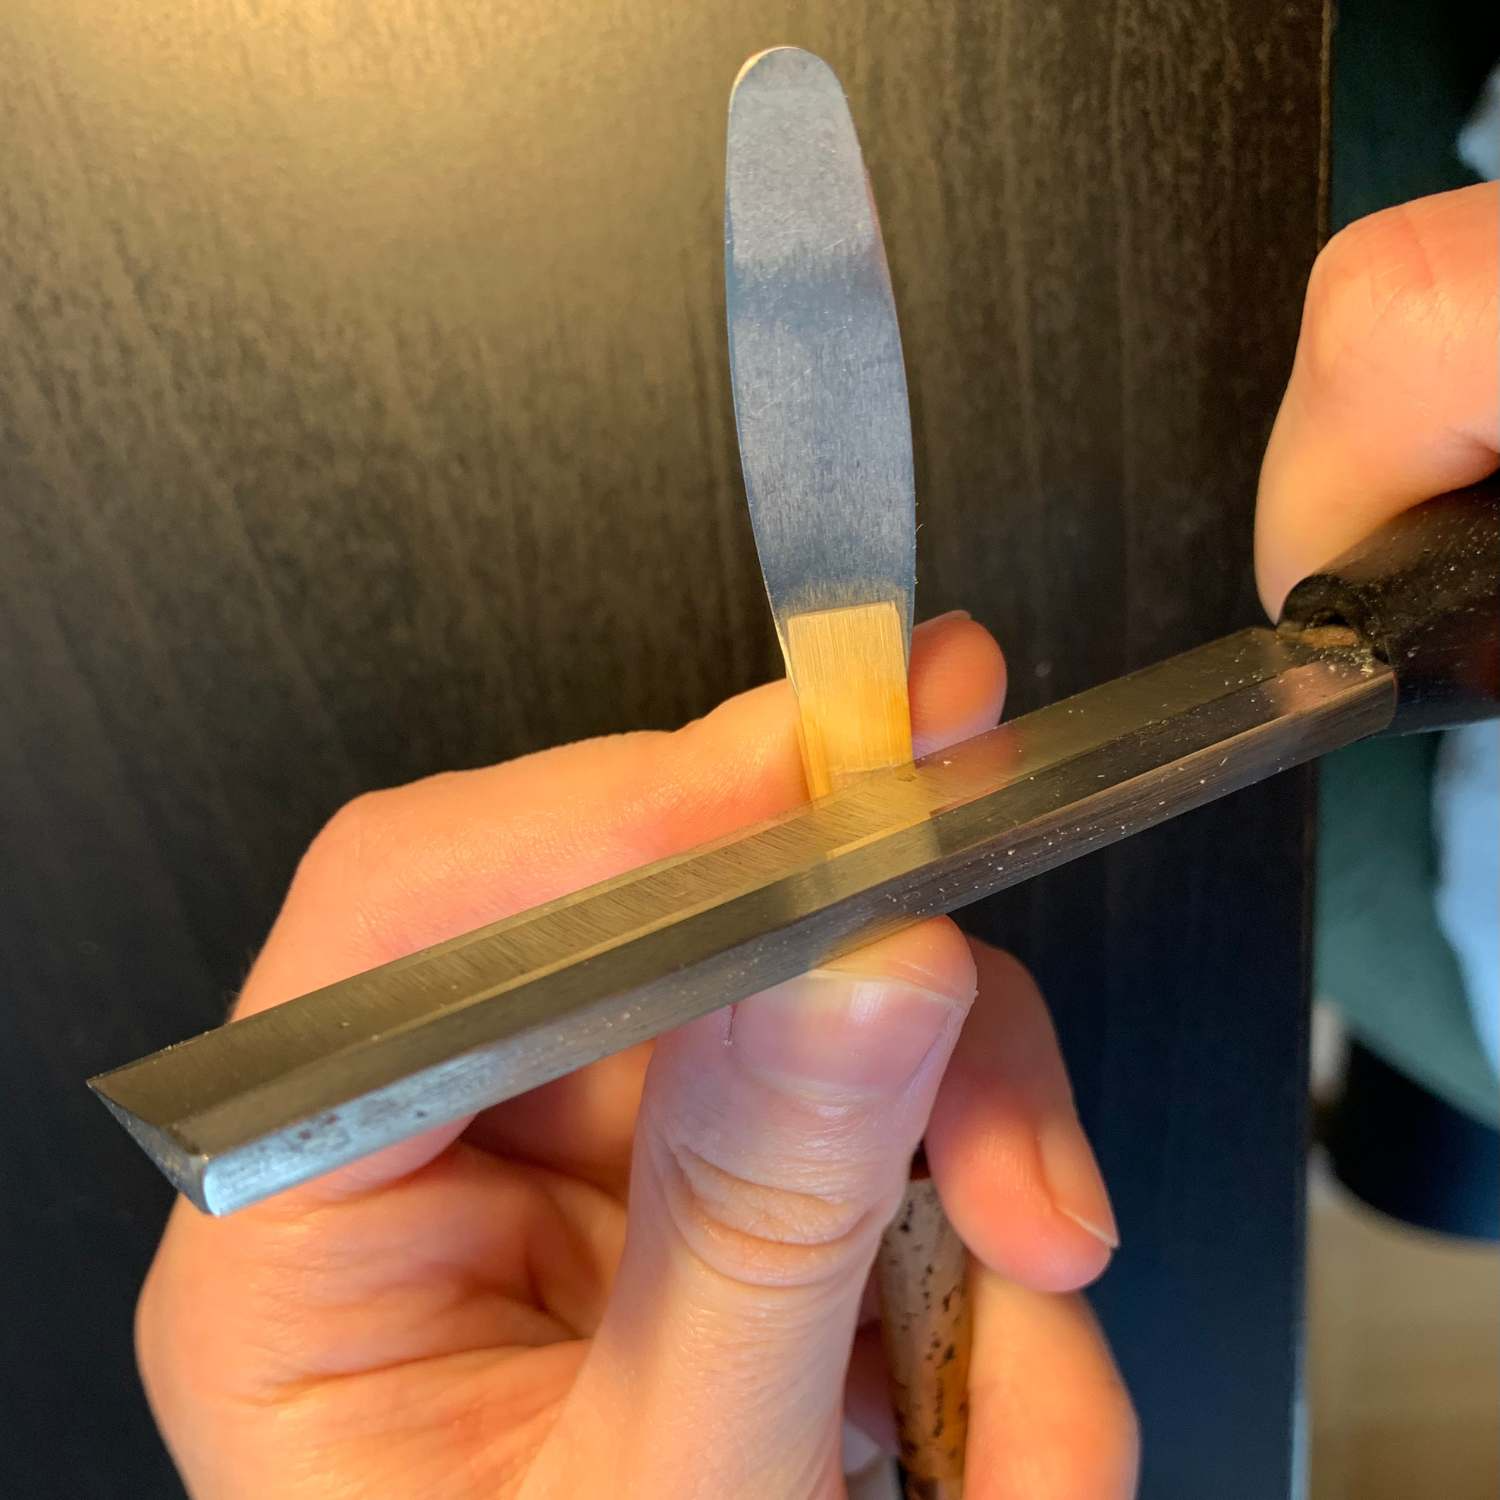
2. Scrape one to three times, making sure to avoid scraping the spine and the rails.
3. Point the knife tip down (up for left-handed), and place the knife on the left side of the heart, like this:
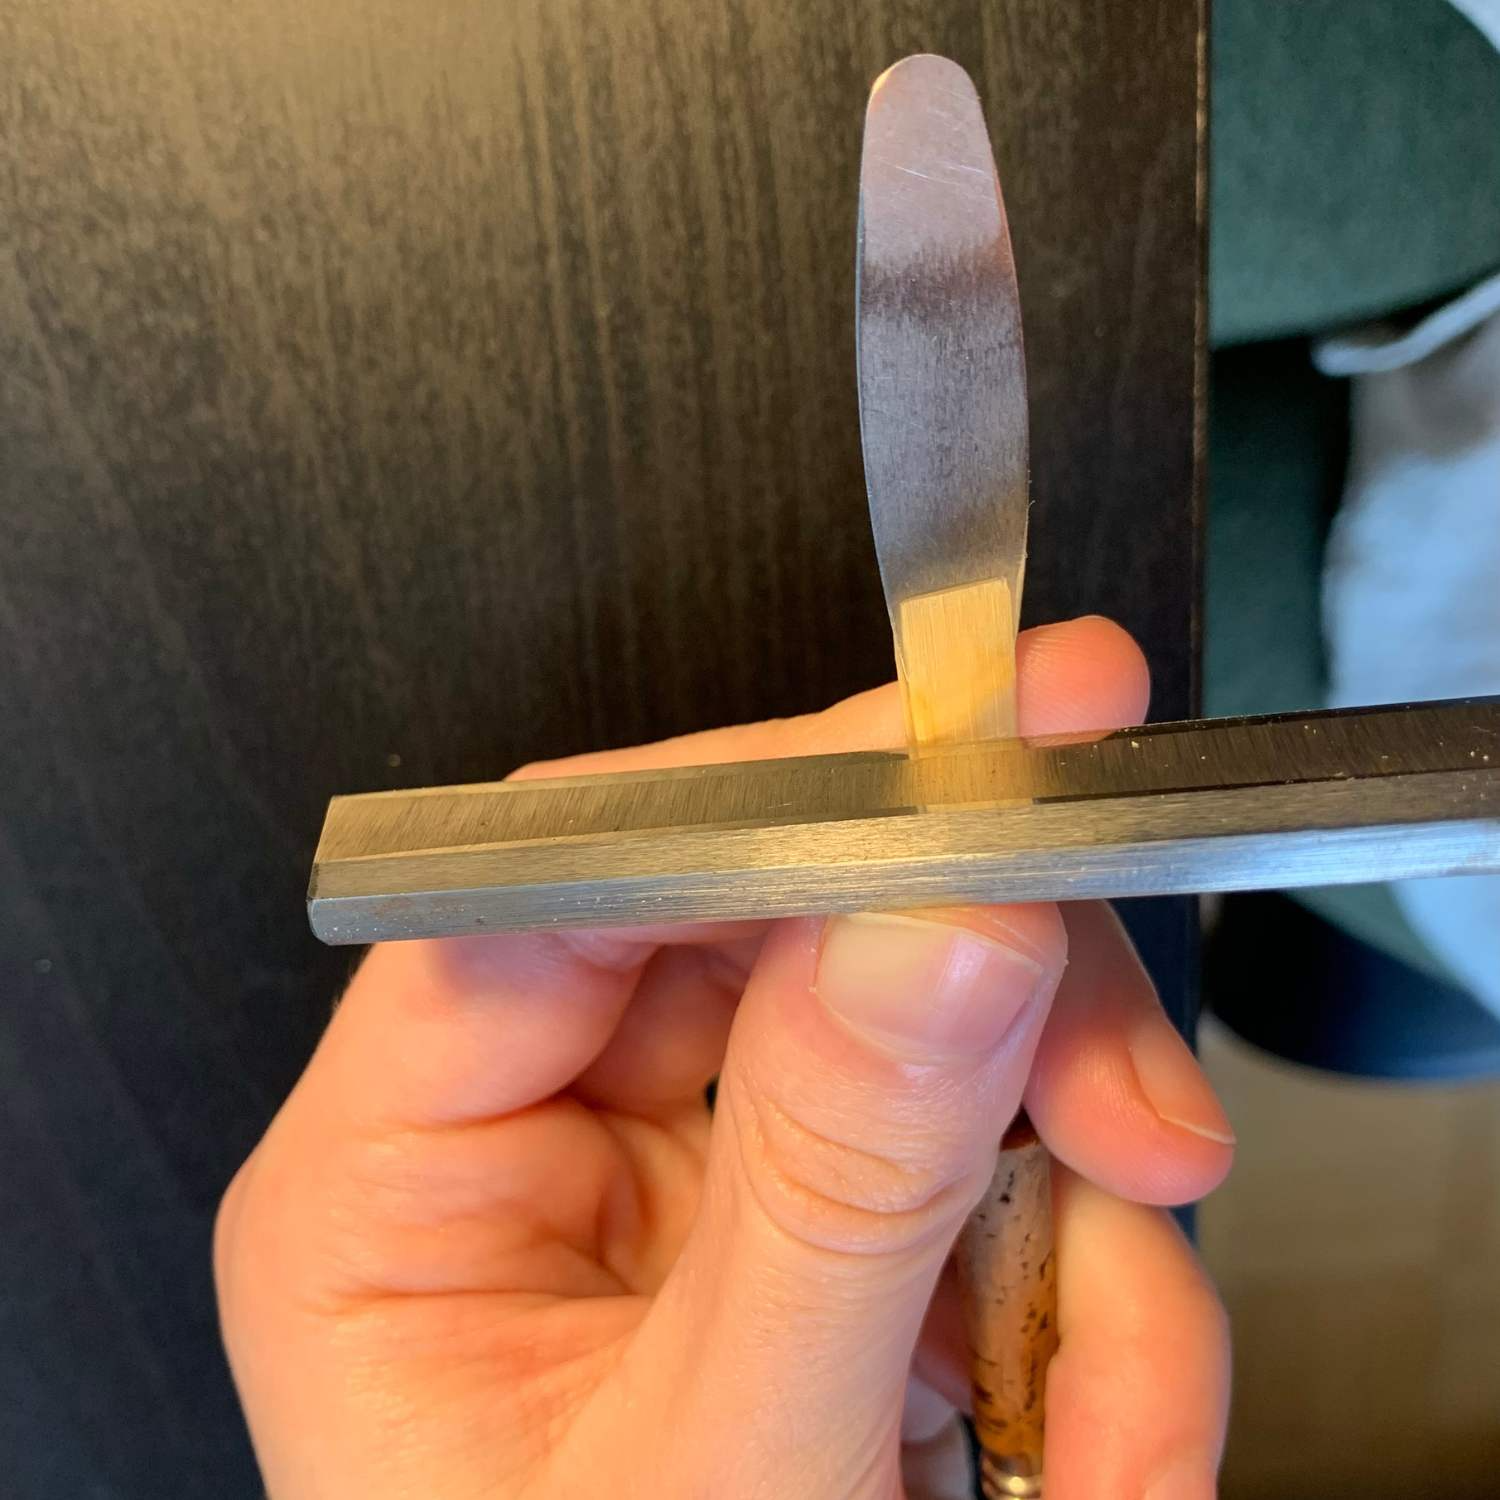
4. Scrape one to three times, making sure to avoid scraping the spine and rails.
5. Scrape the same number of times (on both left and right) on the other side of the reed.
6. Crow the reed, and repeat this process if necessary.
Similarly to scraping the tip, it’s important that all four sections of the heart are the same thickness as each other. To ensure they stay the same thickness as you scrape, count how many scrapes you take on each section, and scrape the same number of times on the other three sections.
How to ensure all sections of the heart are even!
Your reed will function at its best when all four sections of the heart are the same thickness. To determine whether one section is thicker than the others, you can:
- Hold your reed up to a light source. Many oboists use reading lights or bedside table lamps at their desk while they are making reeds. Simply hold your reed up to a bright light and look at the colour of the four heart sections. If one section is a darker colour than the rest, it will need to be scraped to even things out.
- If you are a more advanced reed maker, you may consider using a micrometer/dial indicator, which is a tool to measure thickness down to a hundredth of a millimeter. If you have access to this tool, you can use it to measure the thickness of the four quadrants of the heart.
Adjustment 5: Scrape the Back/Windows
Scraping the back can help lower the pitch of the reed, and increase its richness and depth of sound. It may also help the reed feel less resistant.
To scrape the back:
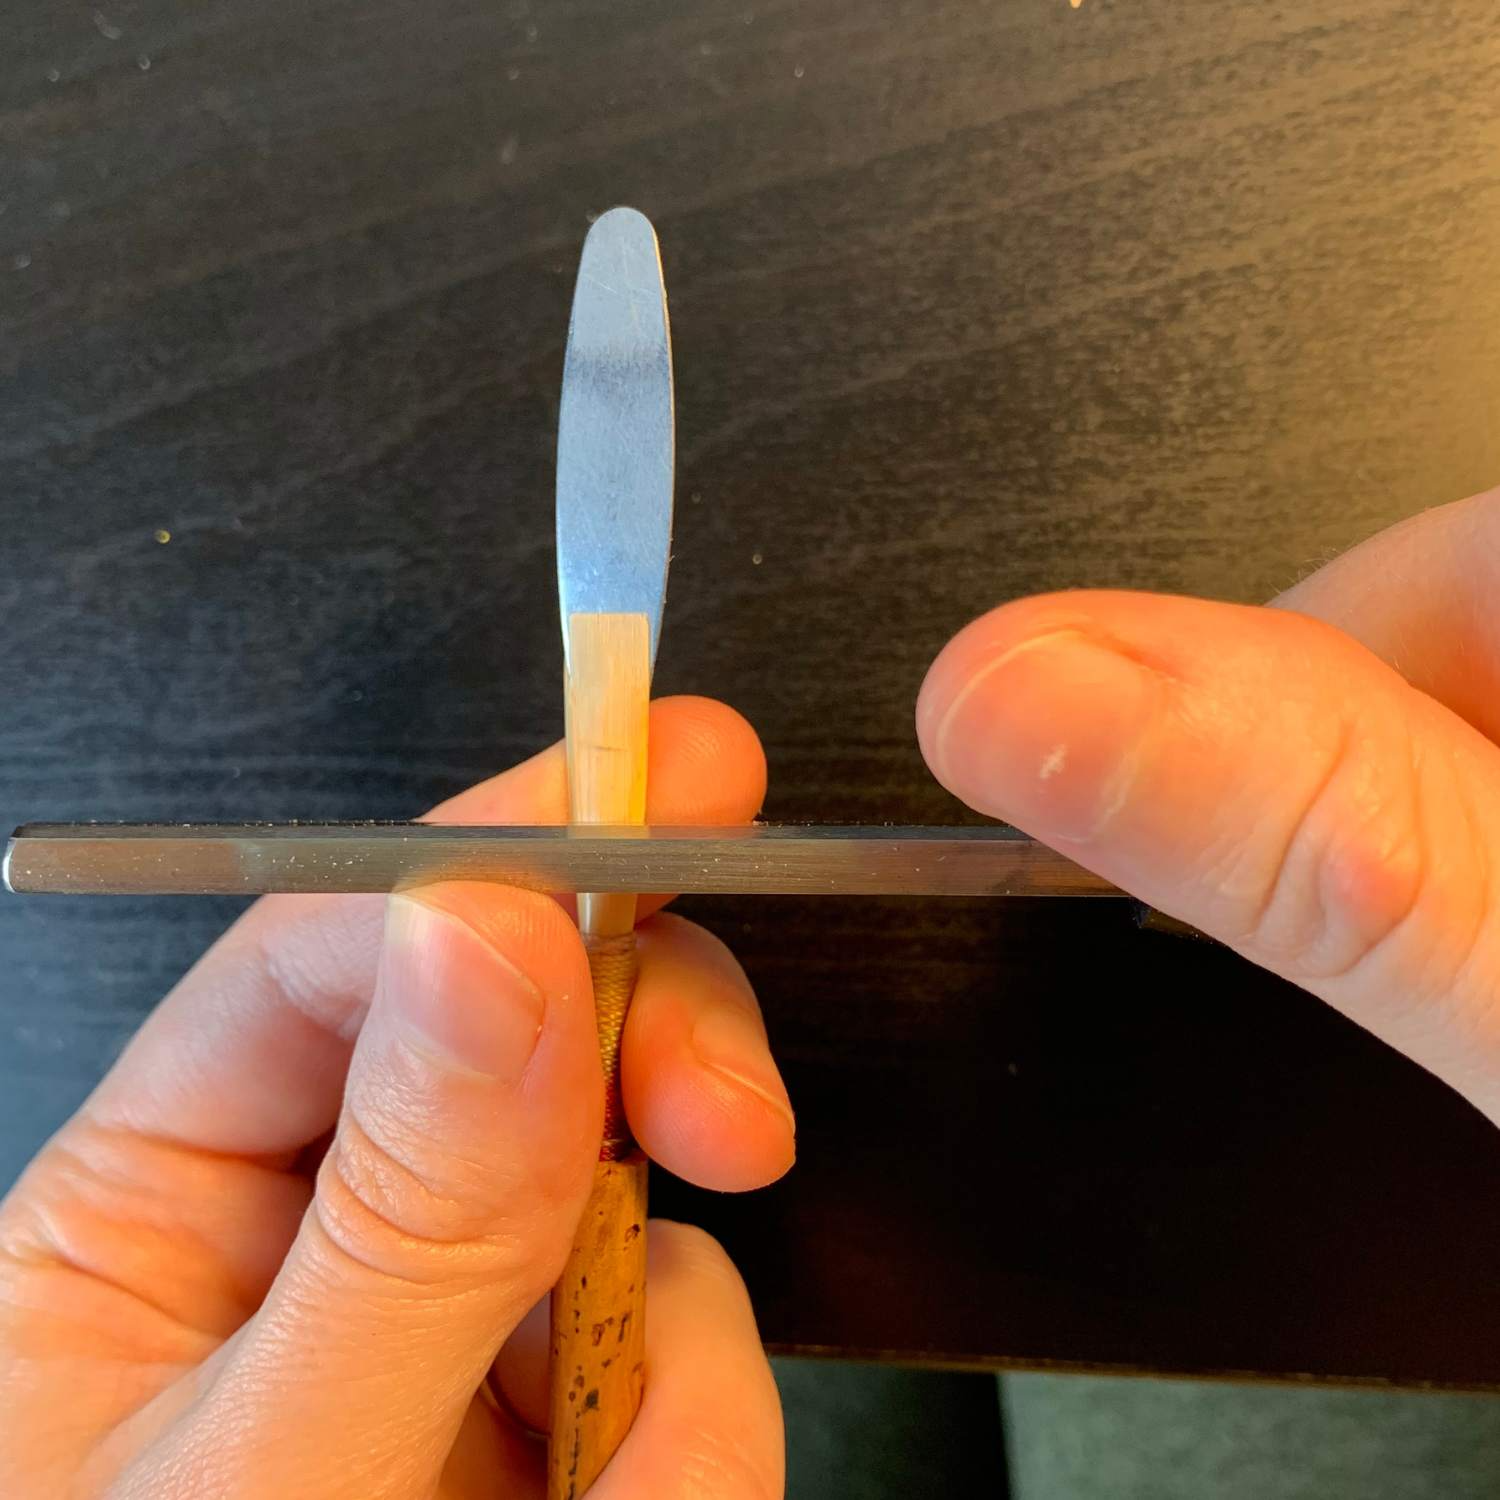
1. Place your knife on the right side of the back, and scrape one to three times, like this:
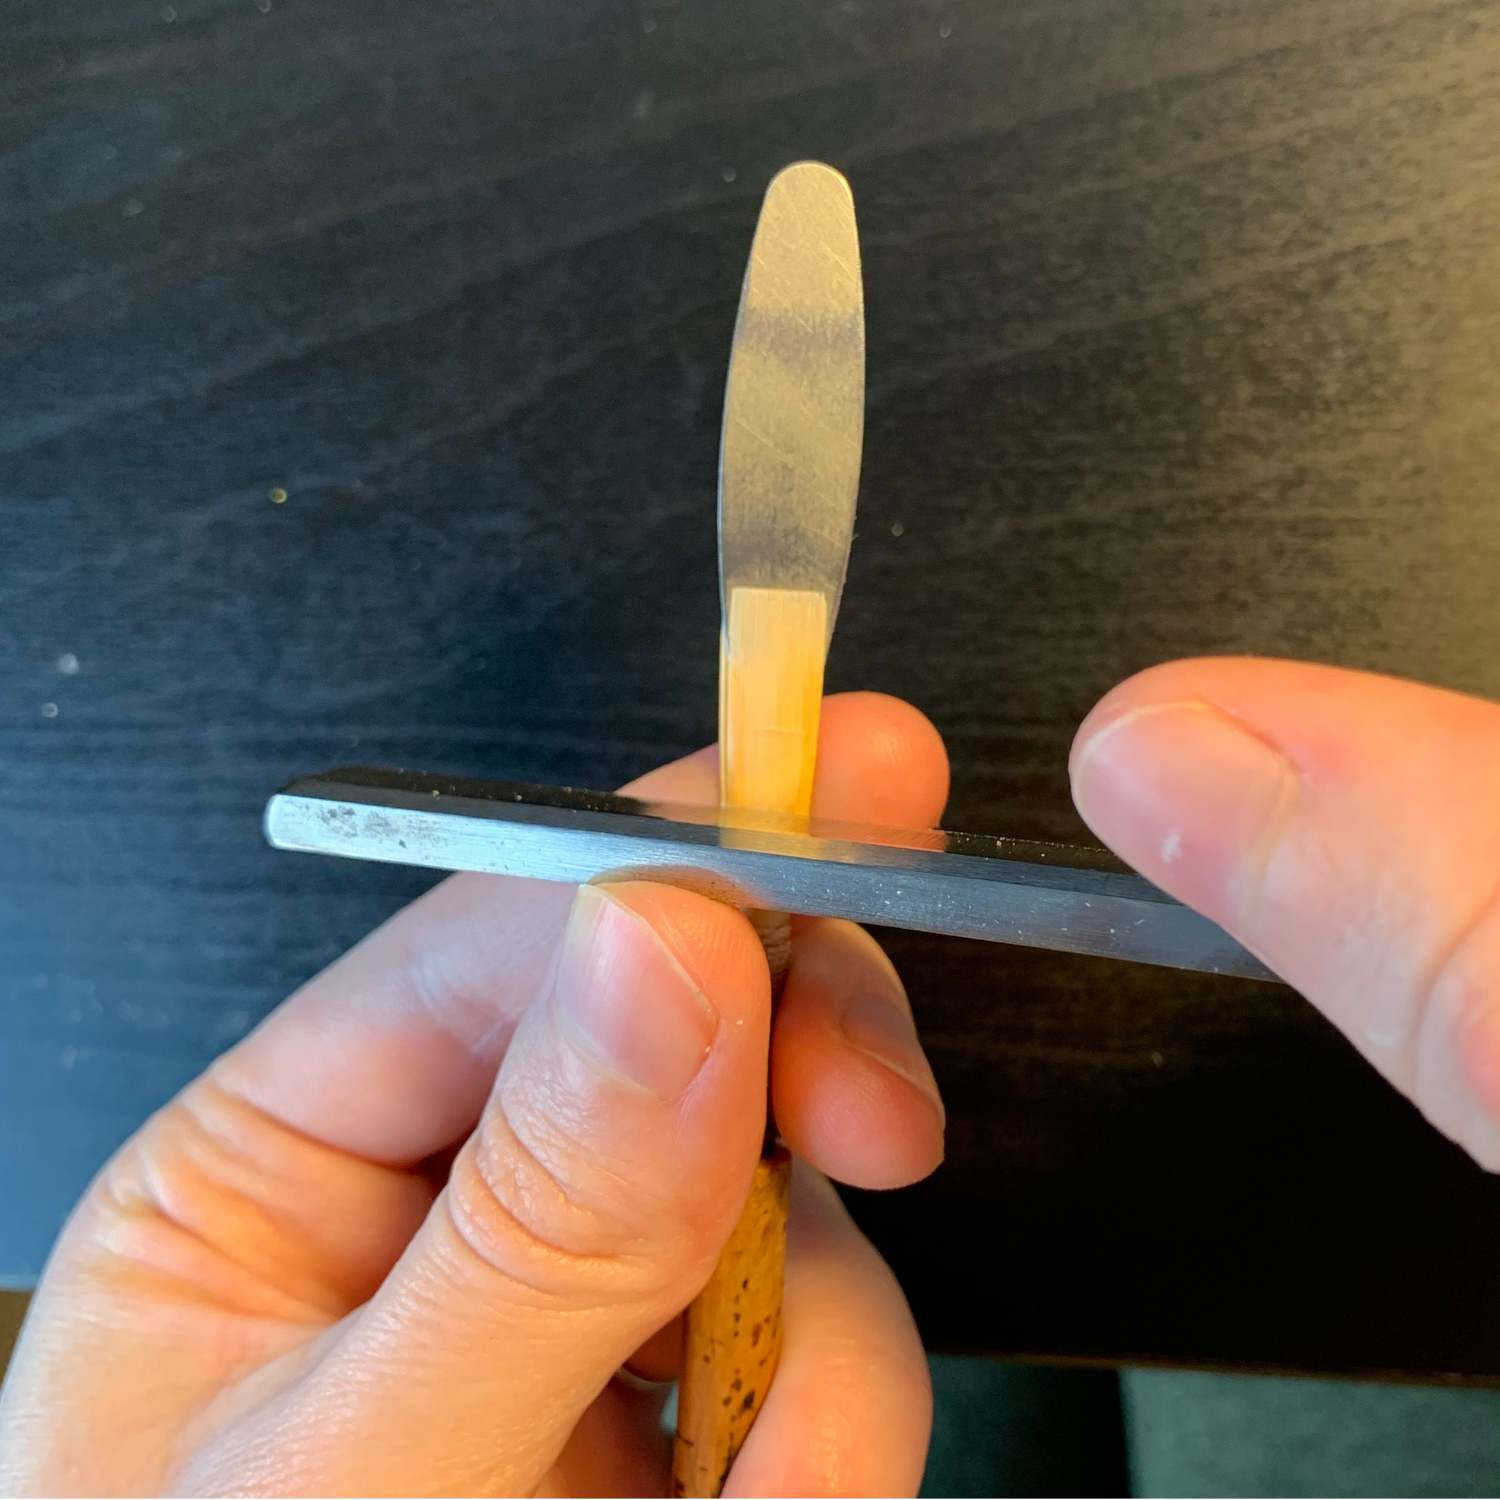
2. Place your knife on the left side of the back, and scrape one to three times, like this:
3. Turn the reed over and repeat on the other side.
4. Test your reed by playing it to see if your adjustment had the desired effect.
5. Repeat if needed.
What do I do if my reed is too…
Sharp
If your reed is too sharp, first check the tip opening size [Adjustment 1]. If the opening of the reed is too small, try increasing it. This could lower the pitch of the reed.
Scraping your reed will also make it lower in pitch. I suggest scraping the back first [Adjustment 5], as this can have an added bonus of improving the sound/tone of the reed. After scraping, try the reed and see if it has improved, and repeat the process if necessary.
If you’ve scraped the back a lot already and the reed is still sharp, you can also try scraping the heart [Adjustment 4]. As this can dramatically alter the function of your reed, I suggest taking only one or two scrapes at a time from each of the four heart sections. Try your reed by playing it to see what the result was. If the reed is lower in pitch but still not low enough, repeat the process.
Flat
If your reed is too flat, first check the tip opening size [Adjustment 1]. If the reed is too open, try massaging it closed. This should raise the pitch of the reed.
If it’s still too flat, next try clipping the reed [Adjustment 2]. Play test the reed after each clip to make sure that your adjustments are having the desired result. If the pitch has gone up but not quite enough, clip the reed again and repeat the process.
Hard
If your reed feels too hard, first check the tip opening size [Adjustment 1]. If the reed is too open, try massaging it closed. This will make the reed easier to play.
If the reed is still too hard or resistant, you will need to scrape it. First, try scraping the tip [Adjustment 3]. Test the reed frequently during this process, by peeping the reed or by playing it with your instrument.
If the peep of the reed feels good but the reed still feels too hard when you play it, try scraping the heart [Adjustment 4]. To determine if the heart needs to be scraped, you can always try crowing the reed. If you only hear one note when crowing the reed, it’s a good sign that you can scrape the heart of the reed more.
Soft
If your reed feels too soft or light, first try clipping the tip [Adjustment 2]. This will increase the resistance of the reed, and it will probably raise the pitch as well.
You can also check the tip opening, and increase the opening size if it looks too small [Adjustment 1].
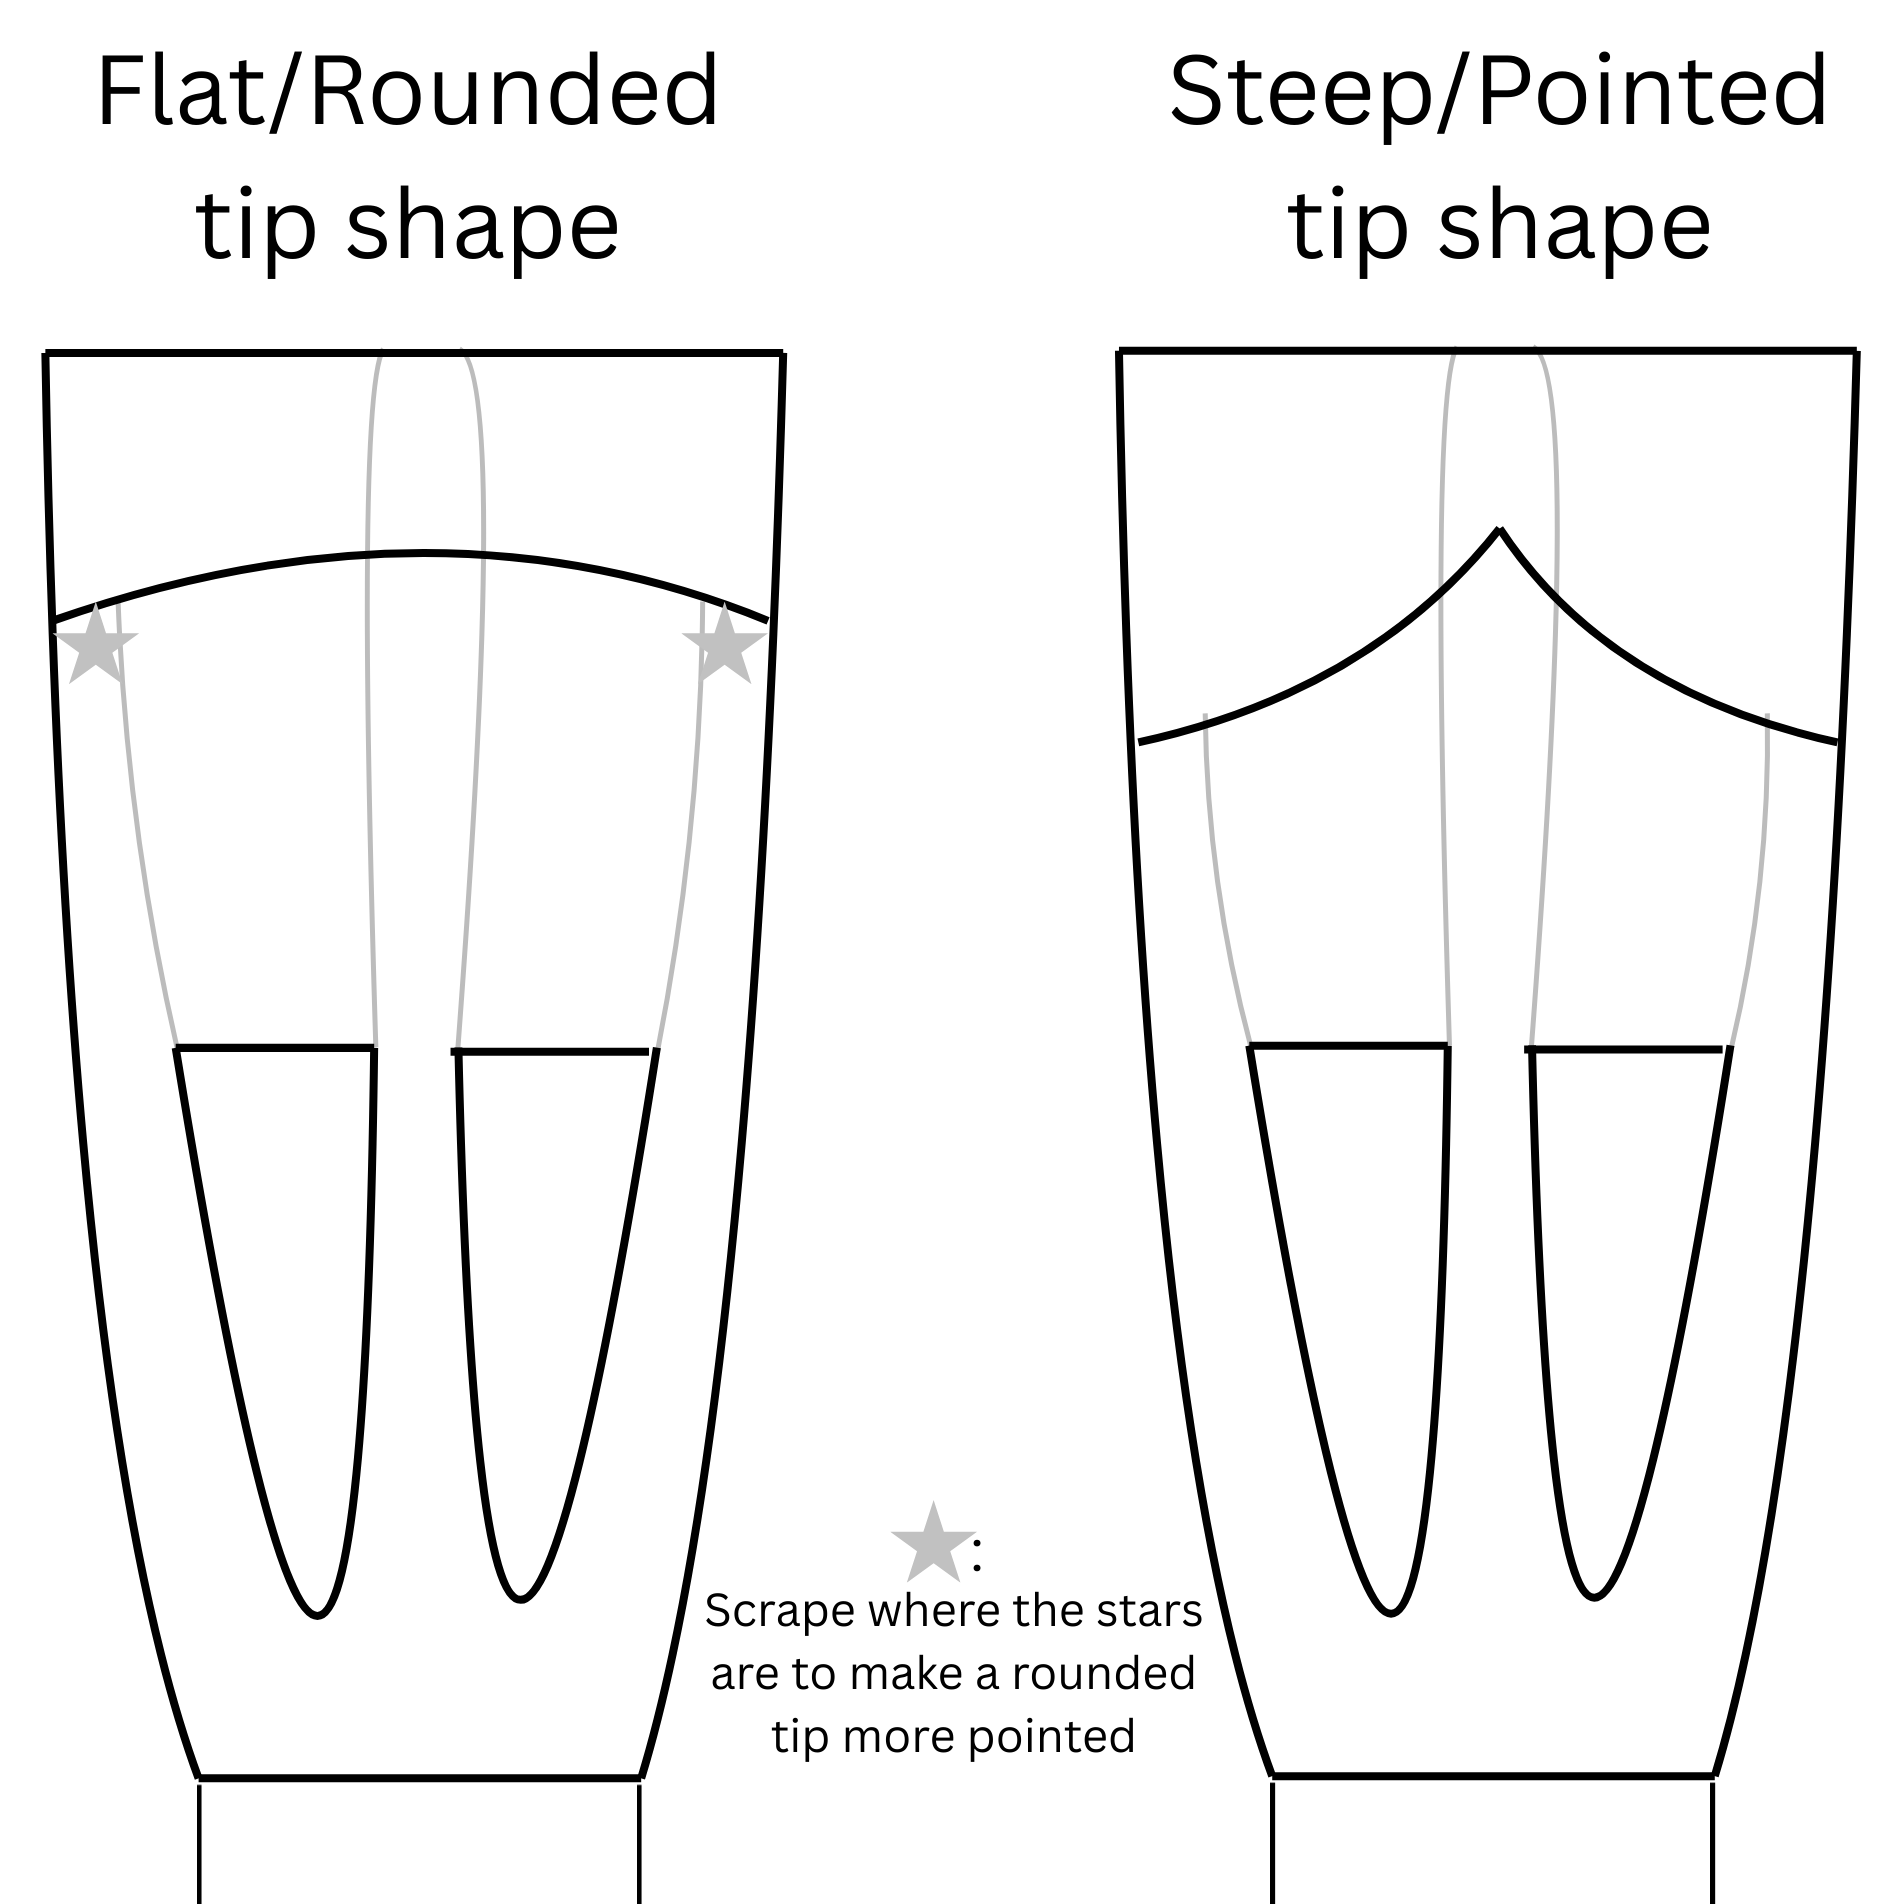
If neither of these options work, take a look at the shape of the transition. This is the area between the tip and the heart. If the shape of the transition is too flat or rounded, it results in a soft or easy feeling reed.
To increase the resistance of the reed, you can make the transition area more pointed/steep. To achieve this, scrape just the side edges of the tip and transition area [Adjustment 3] with your knife angled steeply to the side.
Here’s what ‘flat’ and ‘pointed’ transition areas look like. The stars in the diagram indicate where to scrape to increase the angle of the transition area:
If all of your reeds consistently feel too soft, you may need to source harder reeds in general. If you buy factory reeds, consider changing to medium or medium-hard reeds. If you buy handmade reeds from an oboist, simply ask them to make your reeds a bit more resistant!
Conclusion
This guide on the basics of oboe reed adjusting gives a walkthrough of the 5 basic adjustments you can make on an oboe reed, including changing the opening size, clipping the tip, and scraping the tip, heart, and back. I hope you feel empowered to adjust your reeds to fit your unique needs!
Have a question about the adjustments covered in this guide? Let us know in the comments!