
How to Learn Repertoire Effectively
A Musician’s Handy Guide
Are you looking for some straightforward tips to up your practice game? You’ve come to the right place! In this guide, oboist Anna Betuzzi and bassoonist Zachary Senick will walk you through some techniques and strategies to improve both the effectiveness and the efficiency of your practice time.
While these techniques are specifically aimed at oboe and bassoon players, many of these tips could be useful for other woodwind players, or even other musicians in general!
Setting yourself up for success
The first step for an effective practice routine is creating a space where you can truly focus.
Make sure your practice nook is free of clutter and distractions: a quick 5-minute tidy of your space can do wonders for your concentration!
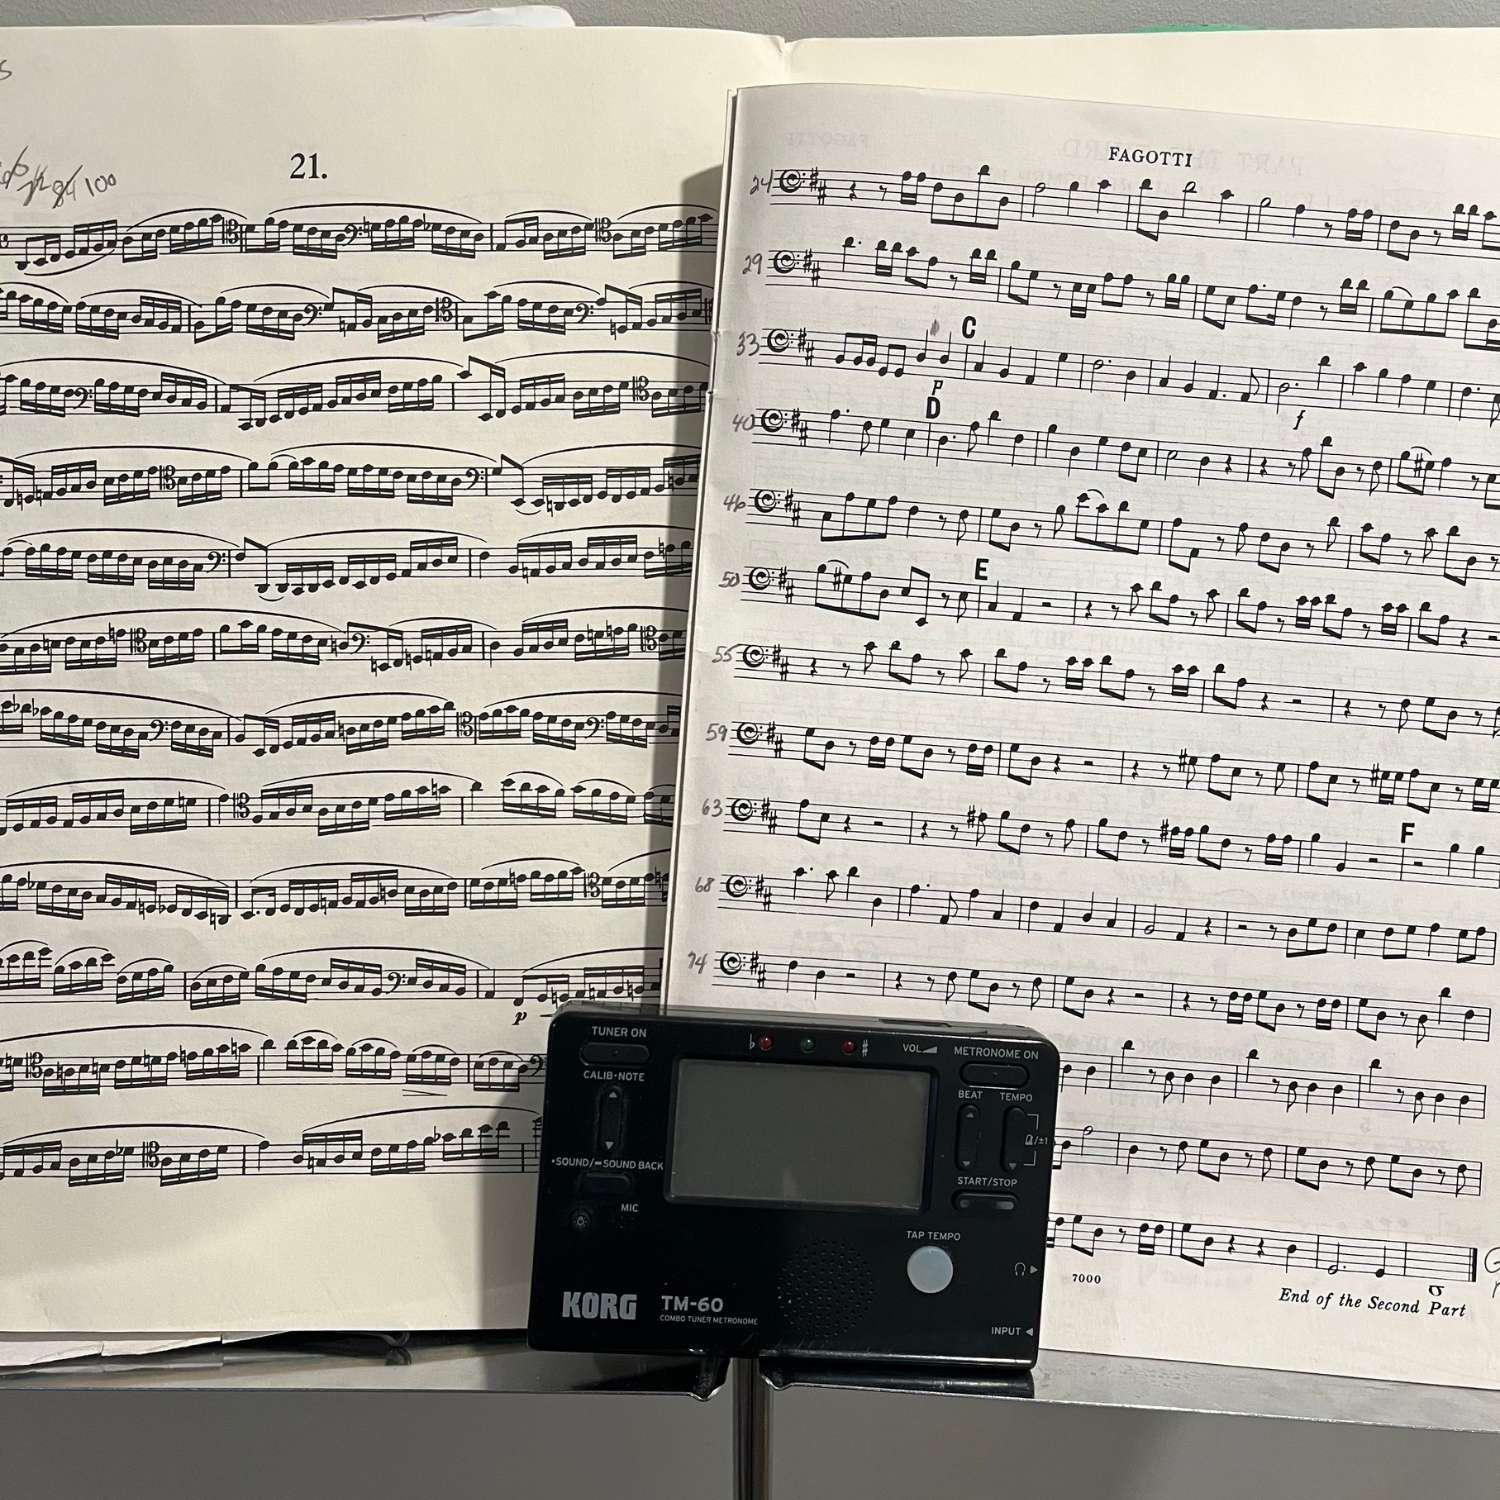
If you are like most people (ourselves included) and you are easily distracted by your phone, consider putting it away or in another room. If you don’t have a metronome/tuner device and rely on a metronome/tuner app on your phone, try putting your phone on airplane mode while you are practicing. We do strongly recommend purchasing a metronome/tuner device if possible, as this will allow you to focus more easily during your practice sessions. We recommend the Korg Combination Metronome and Tuner, available from Long and McQuade or your local music store.
Planning your practice session
Having a plan for your practice session with clear goals laid out will make your practice time efficient and effective.
Consider using a practice journal, either a physical journal or an app, according to your preferences. The first step we’d recommend is taking some time to write down specific short-term and long-term goals that you’d like to work towards in your practice. This could be as simple as learning a new scale, a specific piece of music, or preparing for an upcoming audition or concert. You can also think about specific aspects of your playing that you’d like to spend extra time focusing on, such as rhythm, intonation, or articulation.
Once your goals are clearly established, you can make daily, short-term, and/or long-term practice plans. How you structure your plan will depend on your unique practice style and goals, so use your creativity to create a plan that works for you. Make sure to revisit your plan often and evaluate whether it is working for you, and make tweaks as necessary.
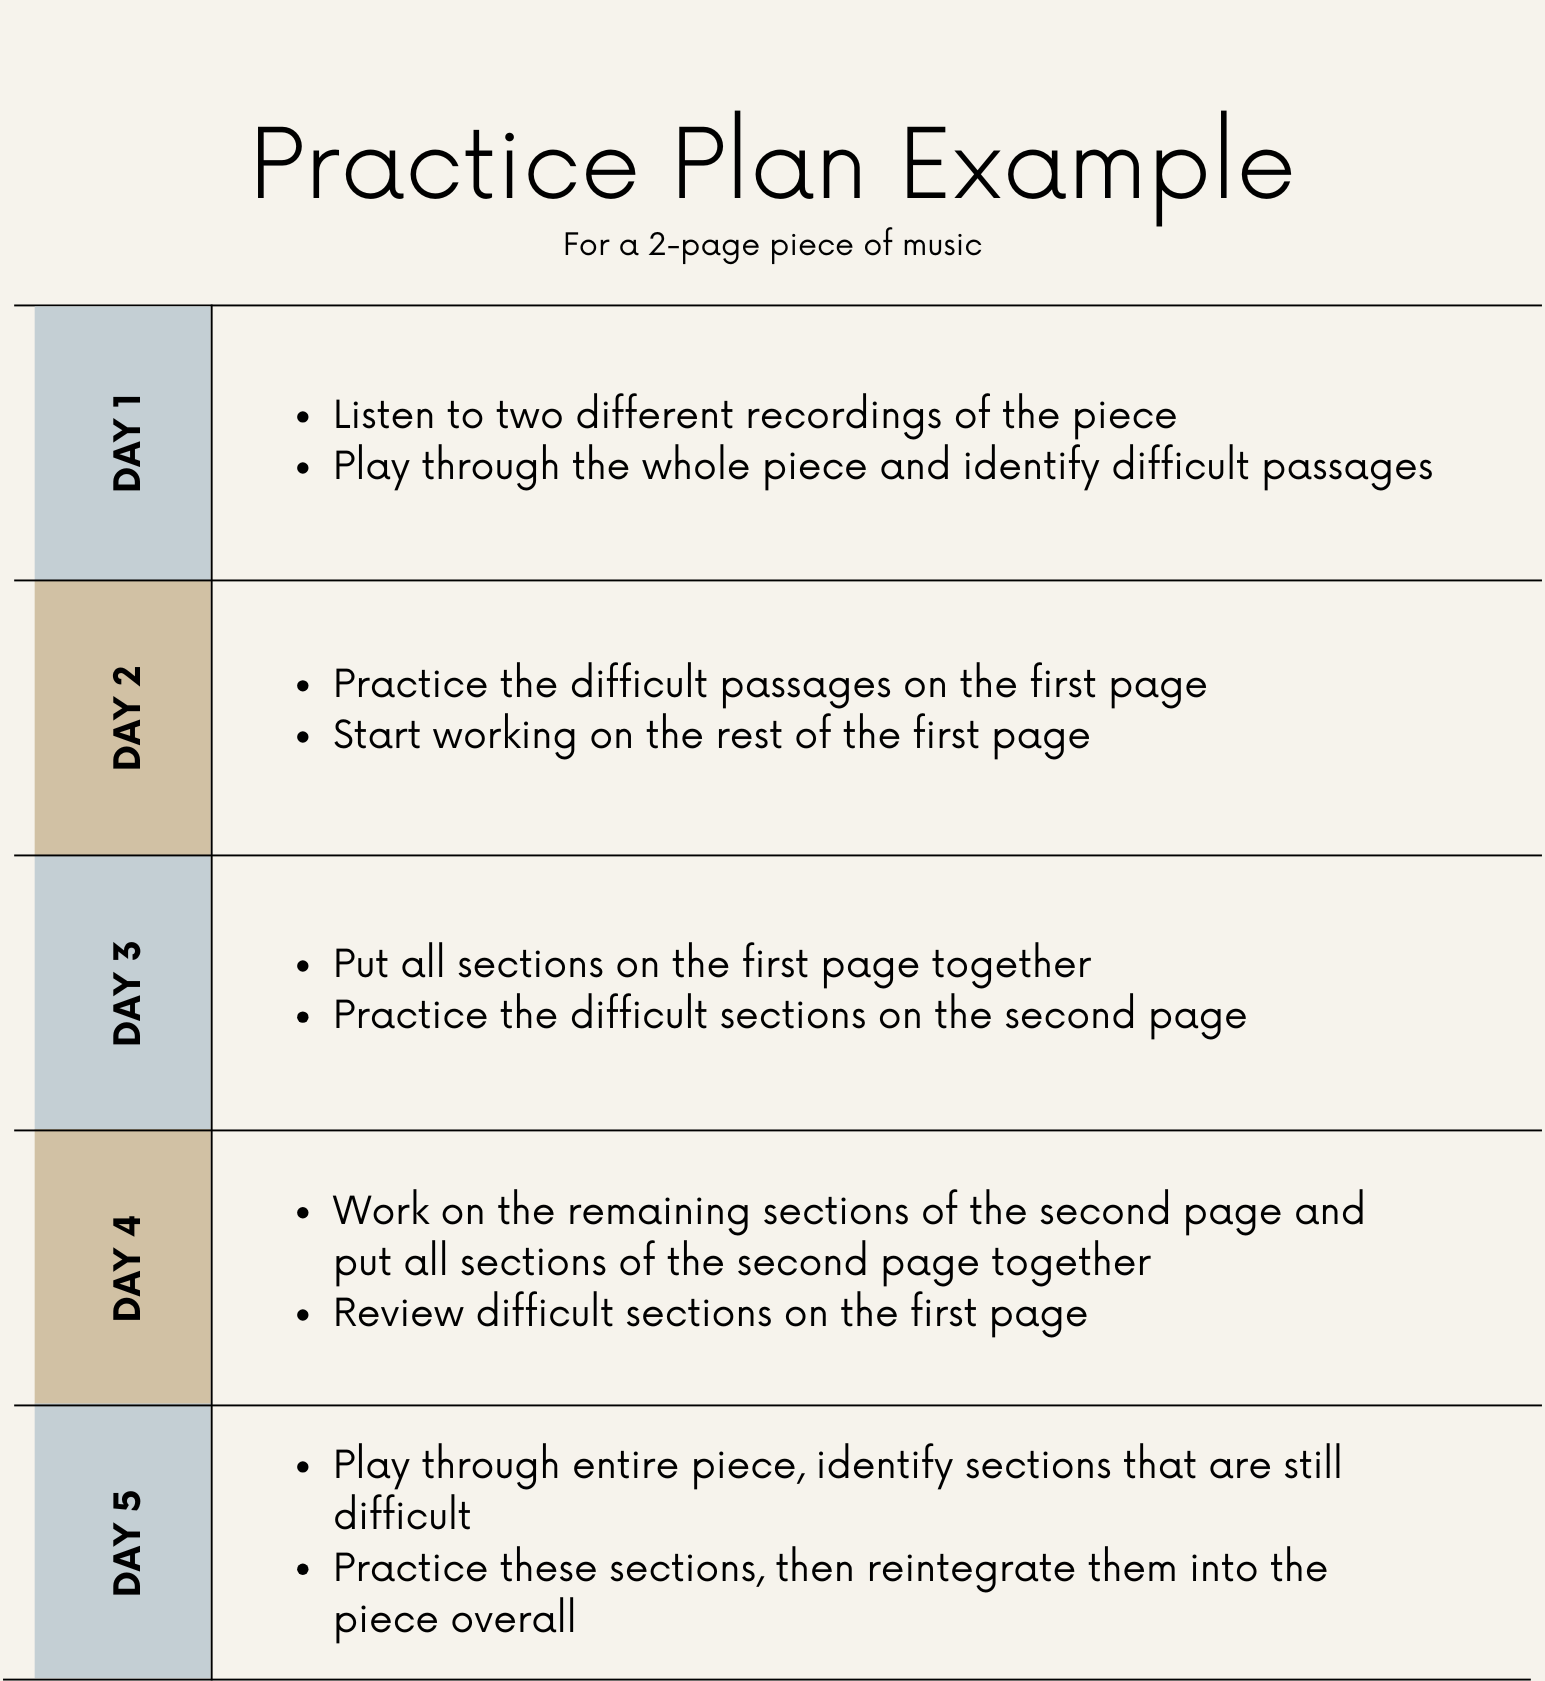
Here’s an example of a short-term practice plan, based on the goal of learning a two-page piece of music over a five-day period:
You can also use your practice journal for anything else that you find useful! This may include tracking which reeds you are using currently, how your embouchure feels after a specific amount of time if you are working on your endurance, or writing down things that you learned at a lesson or masterclass.
Tips for practicing repertoire:
Repertoire is any music that is meant to be performed. This could be music for a small or large ensemble (or group of musicians), or something that you perform by yourself. Band music, orchestra music, chamber music, and solo music would all fall under this category.
There are a variety of different ways you can practice difficult technical passages besides simply playing them over and over again. Here are some ideas to keep your practice fresh and engaging:
Change the articulation
If the passage is articulated (staccato, accented, etc.), try playing it all slurred/legato. If the passage is all legato, try practicing it while articulating every note. This subtle change will keep your brain engaged and open to building new connections. When you go back and play the passage the way it is written originally, it should feel smoother and more fluent.
Rhythm variations
Changing the rhythm of a technical passage is a great way to learn it more efficiently. Playing some of the notes faster and some of the notes slower naturally breaks the notes into groups, which gives your brain time to catch up in between.
- Take a passage of sixteenths and go through all of the rhythmic variations below with the subdivision of each group on the metronome. For example, the dotted rhythms have four 16ths clicking on the metronome, the triplets have three eighths clicking, and the sextuplets have two eighth notes. Play these variations all slurred to focus on the fluidity of the finger connections and stability of the air.
- This exercise allows the brain to systematically pause and have time to process all of the notes in the passage and to work out the difficult fingering changes and intervals.
- Each variation should be repeated four times without a mistake in a row before moving on to the next one to make sure it has been solidified into the muscle memory.
- Start at a very slow tempo, such as quarter note equals 50. Then, each day, increase the metronome a couple of clicks. Over time, repeat the process until you can play the passage effortlessly at tempo.
- The different rhythms can be simplified into a system of short (S) and long (L) notes, essentially divided into different rhythmic subdivisions.
A. Dotted
- a. L-S
- b. S-L
B. Triplet
- a. L-S-L
- b. L-L-S, L-S-S
- c. S-S-L
- d. L-S-S-L
C. Sextuplets
- a. L-S-S-S
- b. S-S-S-L
- c. L-S-S-S/S-S-S-L (combining the two previous statements)
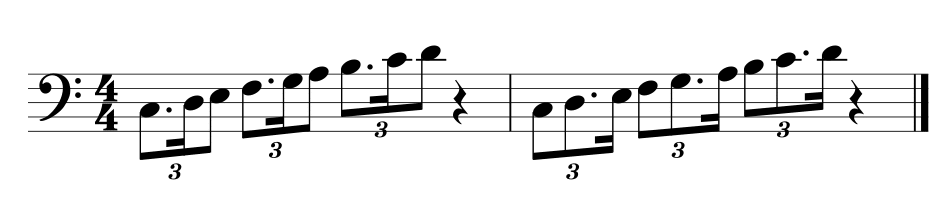
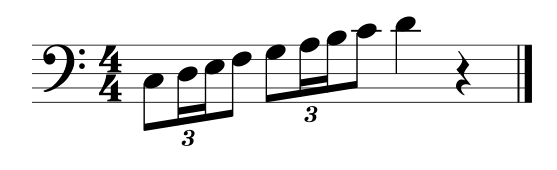
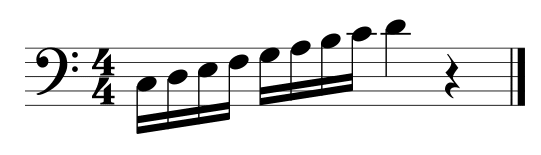
Original Passage
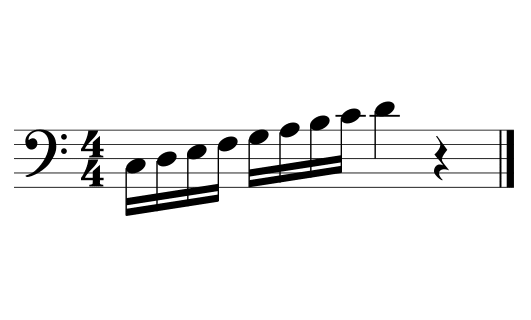
Dotted Rhythms
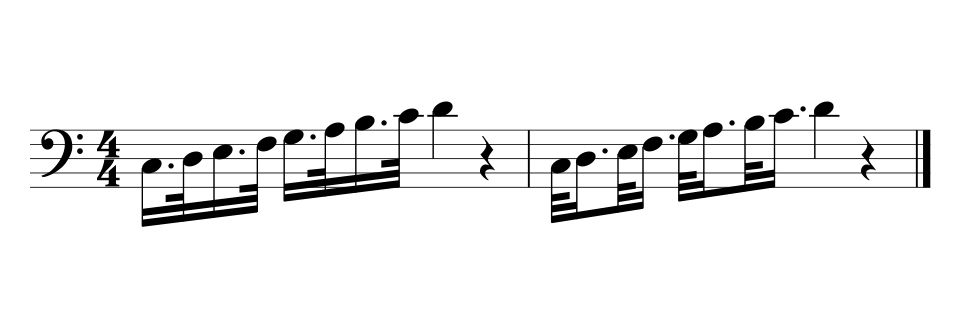
Triplet Rhythms Variation 1
Triplet Rhythms Variation 2
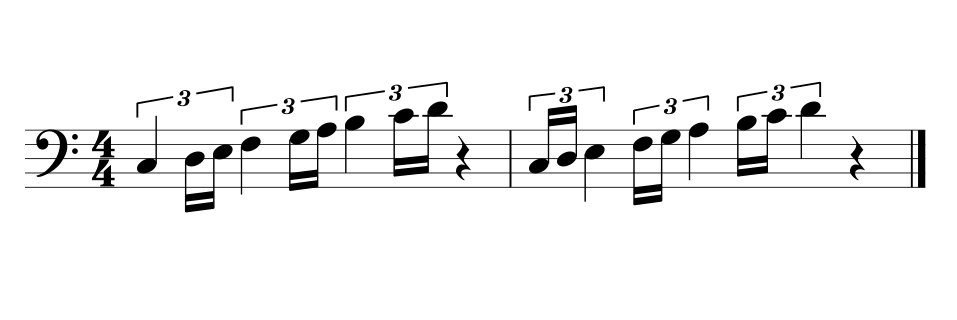
Sextuplet Rhythms
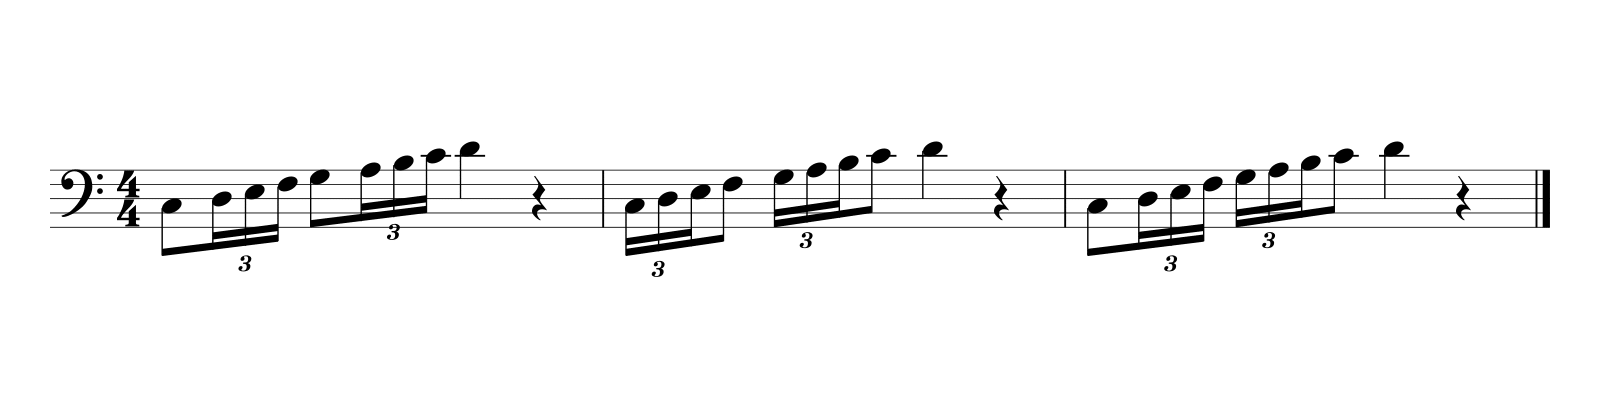
Triplet Rhythms Variation 3
Linking
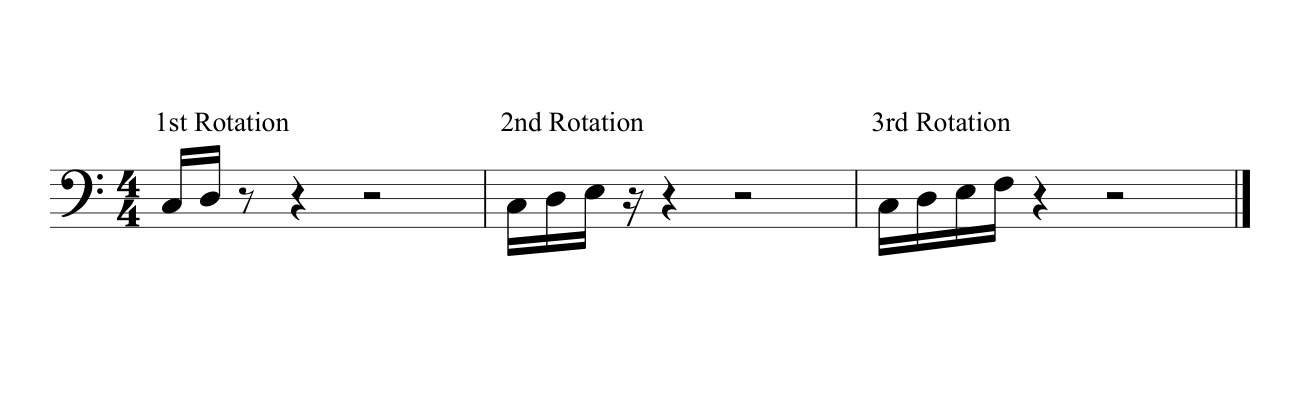
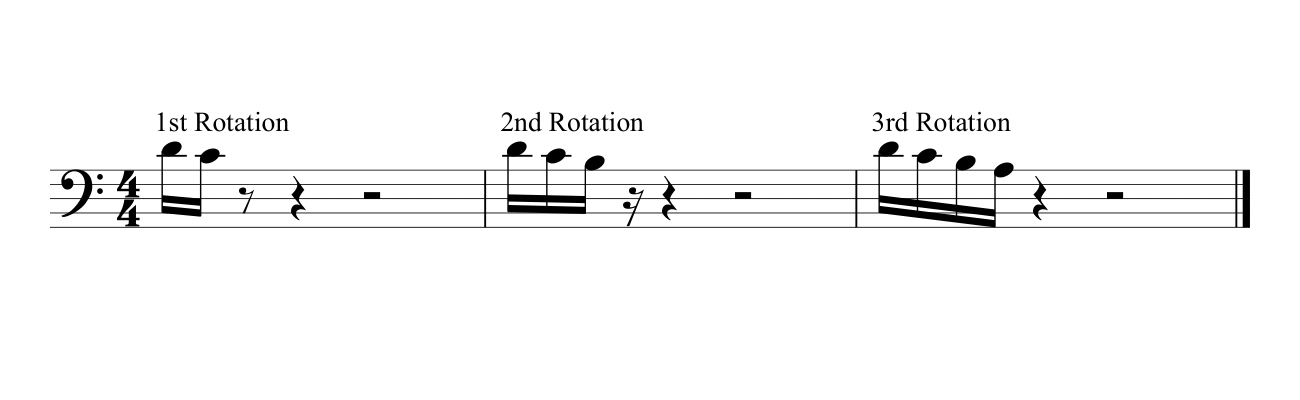
Linking means breaking down a passage and gradually adding one note at a time until you have learned the whole passage.
Start with the first and second note of the passage and repeat them four times before adding the next note from the passage. To ensure that the whole passage is learned equally, be sure to repeat this process, reading the notes both forwards and backwards. For example, a measure of 8 sixteenth notes would be broken down as follows:
- Forward Motion:
- 1st rotation: C-D
- 2nd rotation: C-D-E
- 3rd rotation: C-D-E-F
- continue process
- Final rotation: C-D-E-F-G-A-B-C-D
- Backward motion:
- 1st rotation: D-C
- 2nd rotation: D-C-B
- 3rd rotation: D-C-B-A
- Continue process
Original Passage
Forward Motion
Backward Motion
How to practice with a metronome
A metronome is a great tool to help you find any instability in your rhythmic pulse. It’s important not to become reliant on your metronome (such that you feel unable to practice without it), but using a metronome with intention will greatly improve your rhythm.
If you’re new to using a metronome, try setting it to a medium-slow pulse, such as 60 beats per minute, and record yourself playing with the metronome. Listen back to the recording and notice whether the beats of your playing line up with the clicks of the metronome.
A metronome can also be a great tool for gradually speeding up a passage. Start at a tempo where you can accurately and reliably play every note in the passage. Then, gradually speed up the metronome so that you are slightly pushing your limits each day.
To practice a slow, lyrical passage, try setting the metronome twice as slow as the beat of the passage. For example, if the beat is quarter notes, set it to click half notes. This will give you a better sense of whether your overall pulse is steady.
For variety, you can also have the metronome click on different subdivisions besides just the quarter note. This will help create stability and evenness in your technique, allowing you to notice which notes are rushing or dragging in the passage.
a) Click on the 2nd sixteenth of each beat
b) Click on the 3rd sixteenth of each beat (aka the off-beat)
c) Click on the 4th sixteenth of each beat
d) Click on only beats 1 and 3 of the measure (half note)
e) Click on only beats 2 and 4 of the measure (syncopated half note)
f) Click on each whole note
Record yourself
Another great way to improve your productivity is to record yourself while you are practicing. Think of this like being your own teacher: when you listen back to a recording, it gives you a new perspective so you can hear things you wouldn’t otherwise notice.
Recording yourself can be useful in many ways. It allows you to practice feeling nervous. You can record a small section that is giving you trouble, or record an entire piece to practice your endurance.
We recommend listening back at a later time or another day, such as during a practice break later in the week. Don’t listen back right away, as you need time to ‘forget’ what you were thinking about while you made the recording in order to obtain that fresh perspective.
How to Record Yourself
Use any device you have available to record yourself. If you have a fancy microphone, that’s great, but a cell phone will do the job as well. Just be aware that the audio quality on a cell phone is not great, but it will give you a good representation of your rhythm and intonation.
For best audio quality on any device (including a cell phone), place the device on the other side of the room while you record. This will give you a better sense of what a listener would hear.
Take a break when you need it
Taking a break could mean many different things! It could be a 5-10 minute break in the middle of your practice session, splitting your practice into 2-3 smaller sessions throughout the day, taking a day off of practicing once every week or two, or even taking a week or a month off from your instrument as needed. These all count as a break.
Breaks can be just as productive as any time spent practicing, as they give your mind and body time to process what you’ve worked on. You will return to your instrument with more focus, energy, and creativity. Breaks can help avoid burnout and repetitive strain injuries. Taking a longer break from your instrument is actually a great opportunity to build positive new habits into your playing, as you’ll come back to your instrument with a new perspective and refreshed energy.
If you’re looking for ideas of what to do during a practice break, give these a try!
For a 5-10 minute practice break, you can:
- Do some stretches
- Practice breathing exercises or meditation
- Drink some water
- Have a snack (and don’t forget to brush your teeth if you play a wind instrument!)
- Go for a walk outside
- Read a book
- Chat with a friend or family member
- Play with your dog/cat/other pet, if you have one
For a break between two larger practice sessions that you’ve spread throughout your day, try:
- Listening to your repertoire pieces
- Studying the score of any ensemble pieces you’re playing
- Making reeds (if that’s something you do)
- Carrying on with your day! Cook a healthy meal, spend time with friends, work on a favourite hobby, spend some time outside.
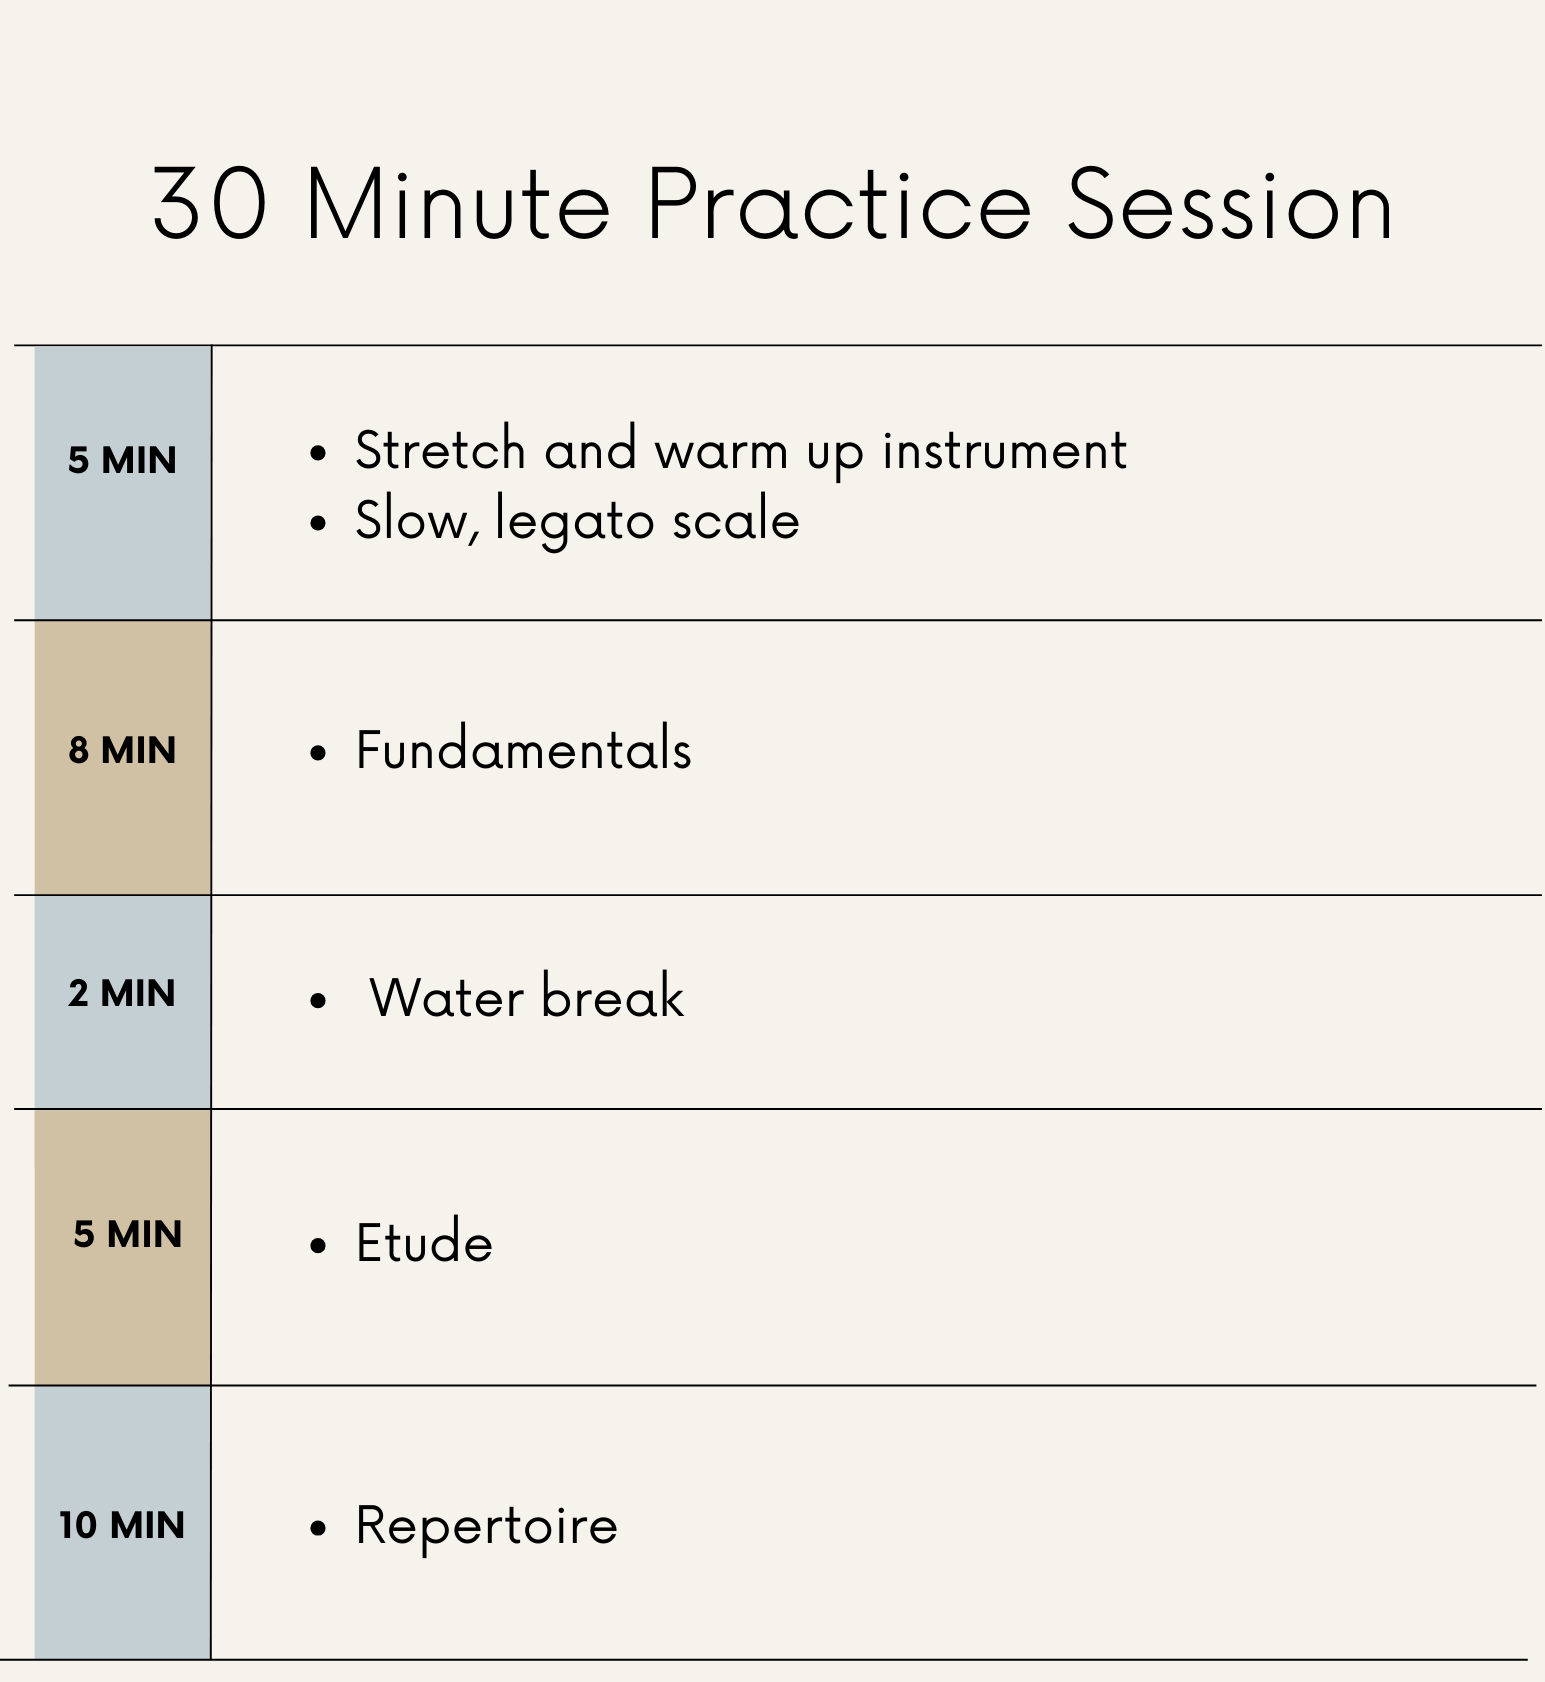
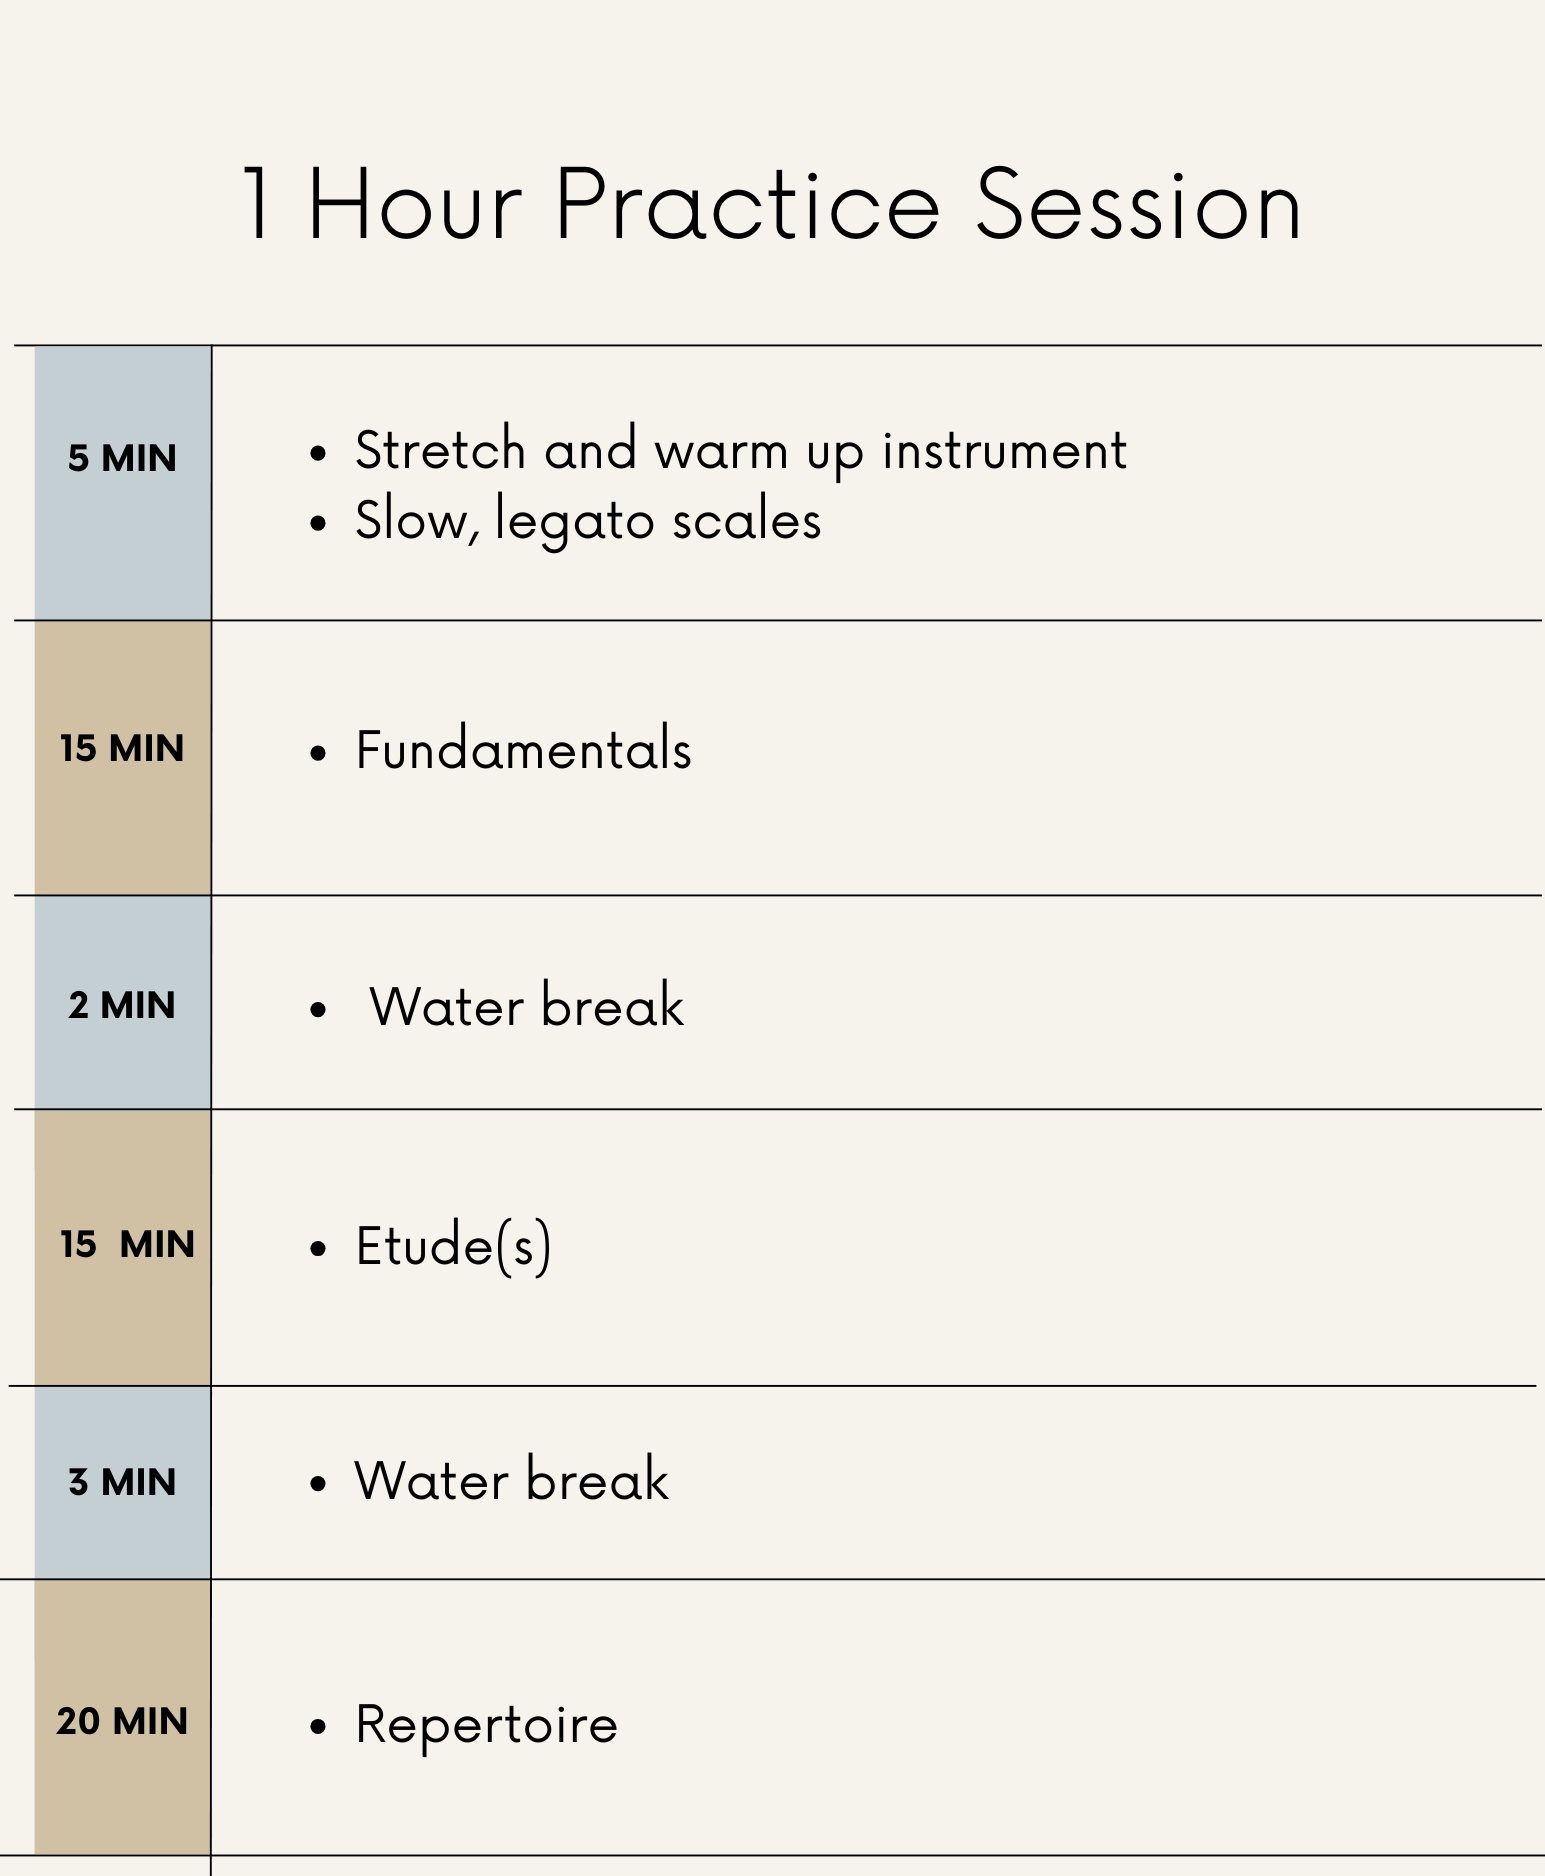
Sample practice sessions!
Here are two sample practice sessions that we’ve put together, including a 30-minute session and a 1-hour session. Remember to tailor your own sessions to your specific goals, and always feel free to experiment as you figure out what works best for you!
We’ve included warmups, fundamentals, and etudes in these practice plans. For more information on these other elements of a practice session, check out our How to Start Your Practice Session article!
Conclusion
We hope you’ve enjoyed this article on different techniques to improve your practice efficiency. Planning your practice session and breaking the session into smaller chunks, employing a variety of articulations and rhythms to solidify technical passages, and using tools such as a tuner, metronome, and audio recorder can all make a difference in your playing.
For more tips on how to warm up effectively, check out our article on How to Start Your Practice Session!